The Best Slouchy Hat Crochet Pattern

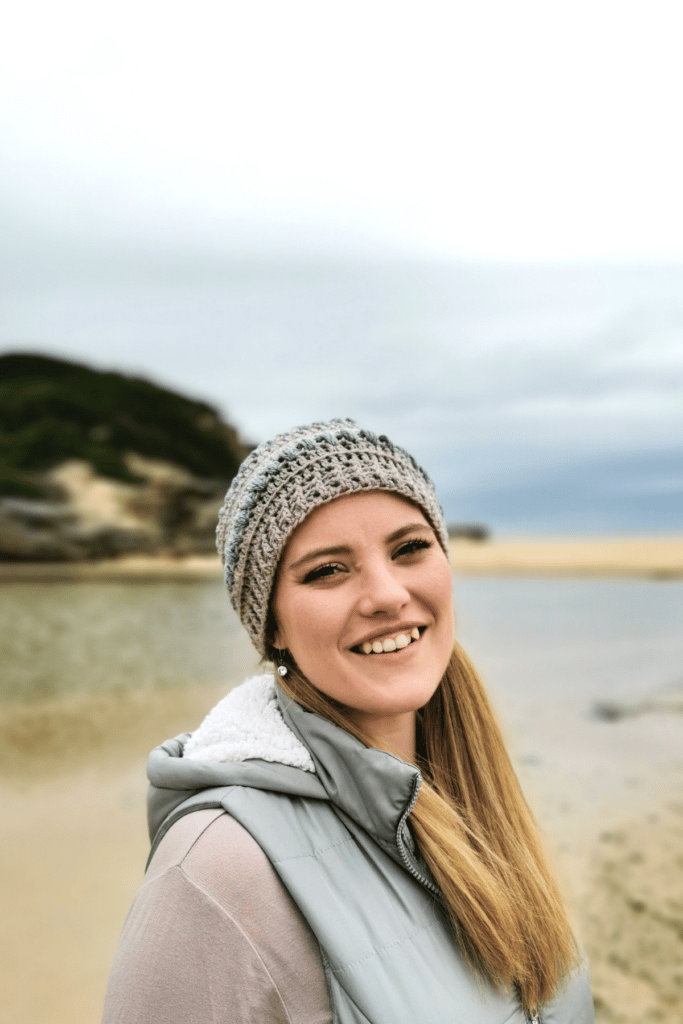
The best slouchy hat crochet pattern has arrived and it’s ready to be made with your stash of DK light weight yarn! This easy beanie crochet pattern uses the bare minimum of yarn and whips up within a few hours for you to enjoy in the cold winter!
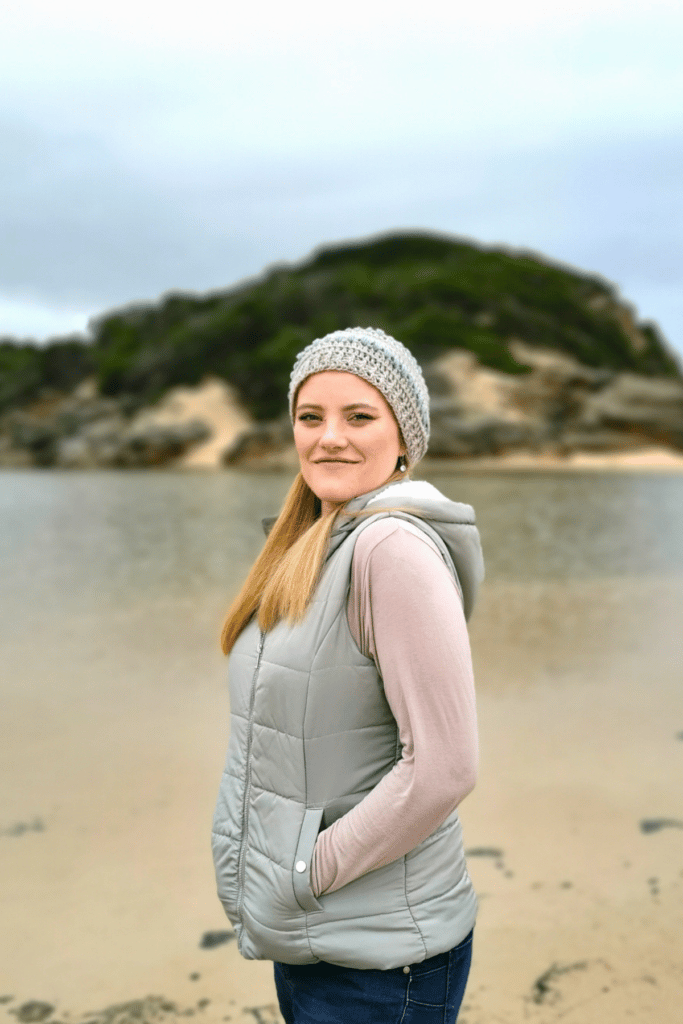
This slouchy beanie is perfect for those cold winter days, I made myself a few in different colors to fit my closet. And I also made a lot to gift to the people close to me! So come along for the ride that is the best slouchy beanie crochet pattern of 2022!

Let’s dive into the deeds:
Before you start with this crochet slouchy hat, here are some important things to know and some background around this pattern.

The Detail of the Slouchy Hat Crochet Pattern
This is a hat crochet pattern that I’ve been working on for more than a year! I started my blog and wanted to design a slouchy beanie, but couldn’t for the life of me come up with something I was completely happy with. Until now!
I struggle with anxiety sometimes and in the month of mental awareness (May) I designed this beanie. It’s my calming crochet pattern, because I can relax and enjoy crocheting this beanie while watching my favorite show (Chesapeake Shores 🙂 ) and in a matter of a few hours, and episodes, I’m done! I just love crocheting so much!
A little more about the style of the slouchy beanie…
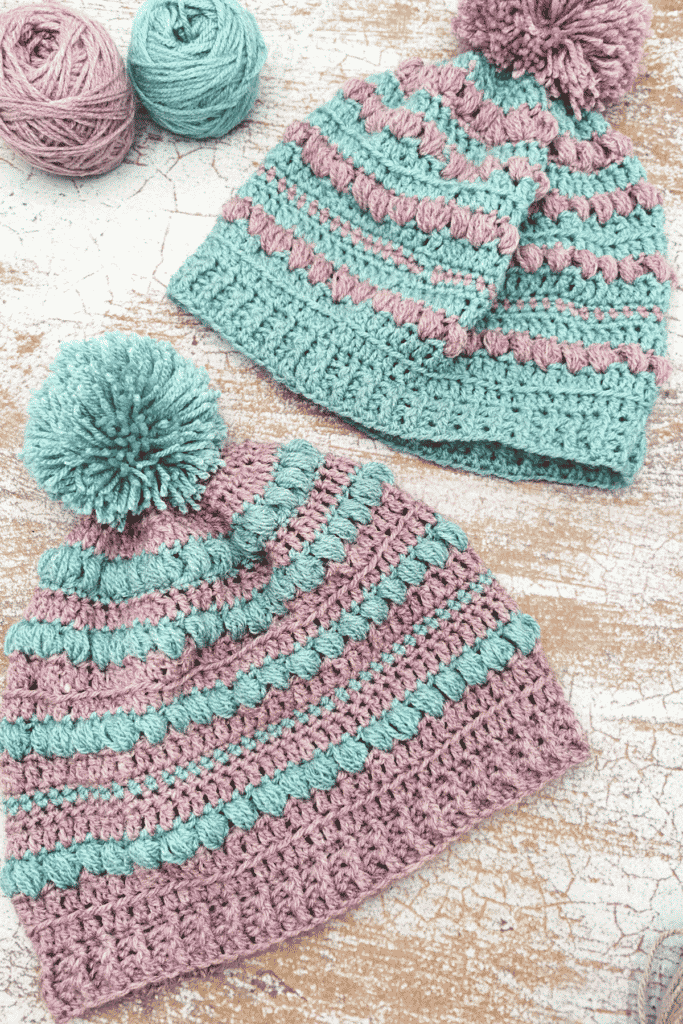
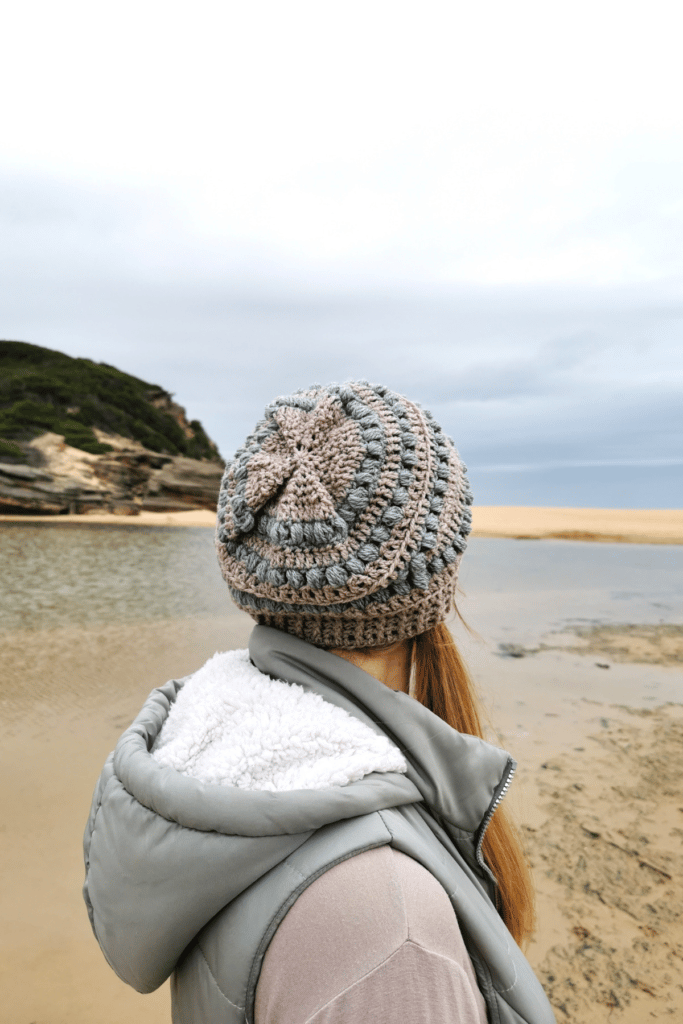
Starting with the brim – made out of front and back post double crochets, the brim is an easy getaway from your normal “single crochet in the back loop only” brim. I love the texture of it and it works up really fast!
The rest of the slouchy beanie is crochet out of a combination of puff stitches (which I adore) and single and double crochets. The 3 rows of single crochets in the middle of the beanie creates the bump at the back of the beanie which, I think, is a statement of the Slouch!
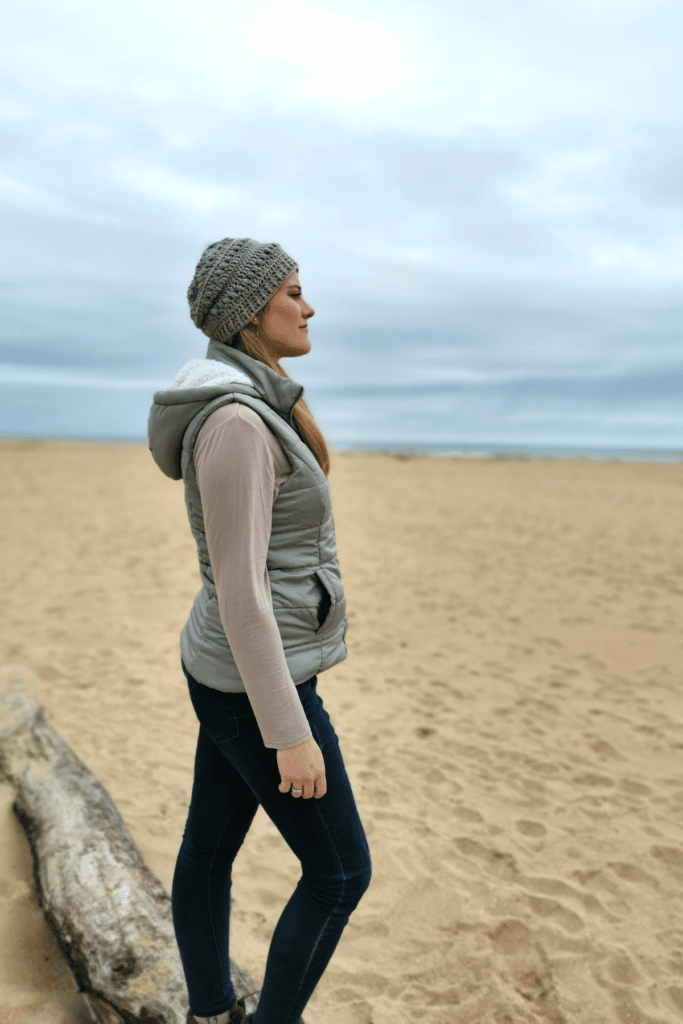
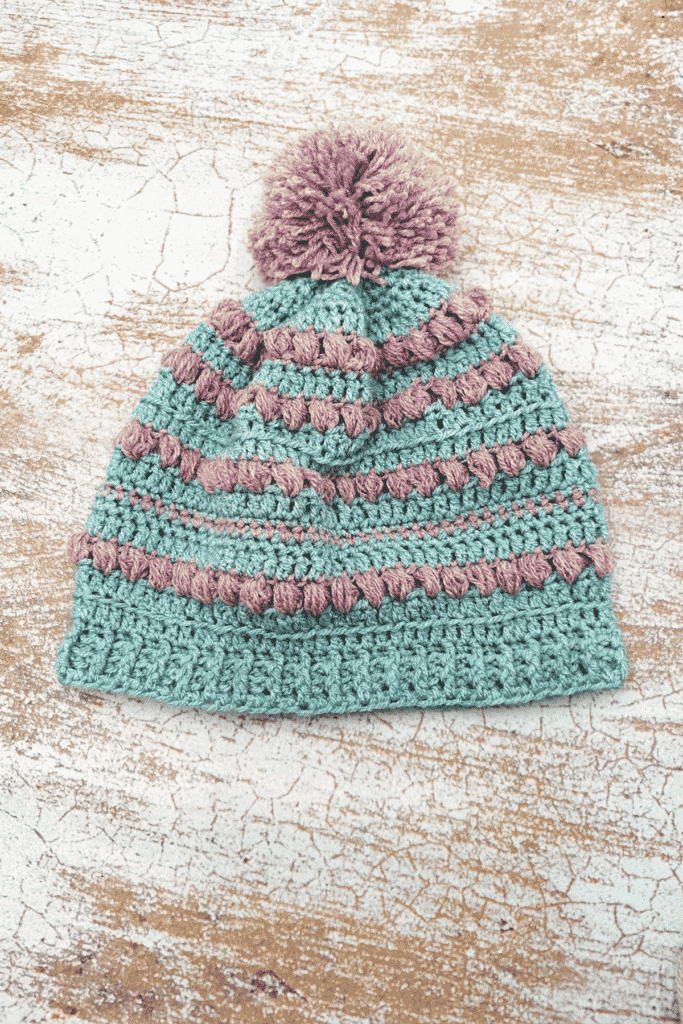
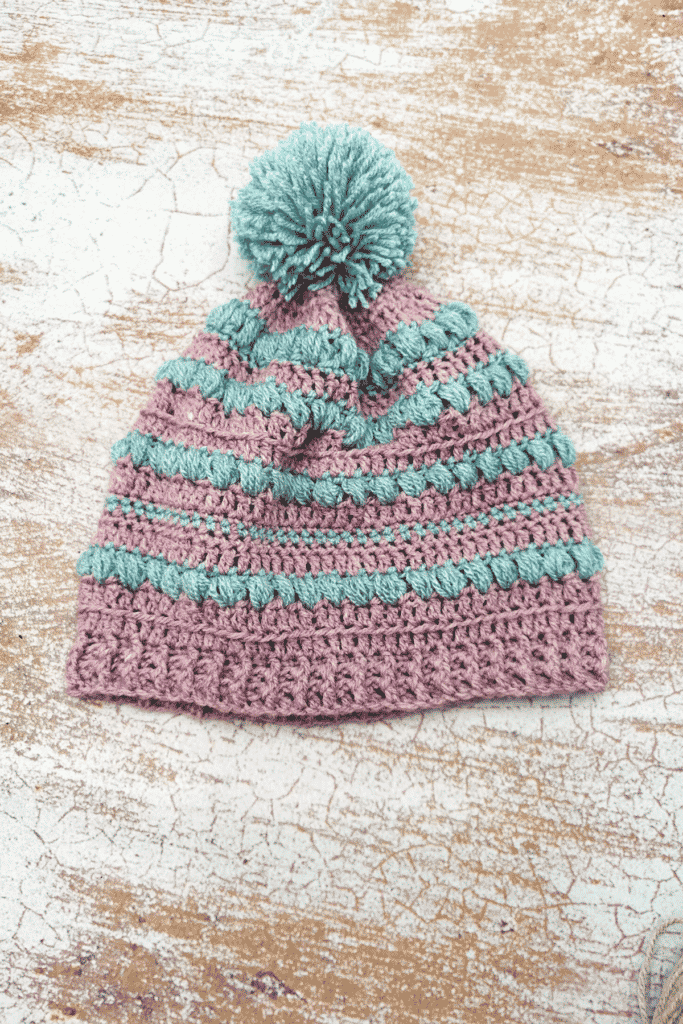
Furthermore, you can add a pom pom to the beanie to make it even more slouchy! The weight of the pom pom gives a little weight to the crochet beanie which directs it to the back. I loved adding the biggest pom I could make to the blue and purple (the candy floss twins), it gave them so much character! Scroll down to see them!
While your here :), be sure to have a look at some of my other free crochet patterns like:


All patterns on my blog are absolutely FREE of course!! 🙂
The pattern level:

This Slouchy Hat crochet pattern is an Intermediate crochet pattern. This sounds a bit daunting, but all you need is a little bit of extra concentration on reading and following the pattern. So if you are a beginner, please don’t feel discouraged! You can make this your first next level crochet pattern!
You need to know the following:
- How to read a pattern
- Single Crochet (Sc)
- Double Crochet (Dc)
- Single and Double Crochet 2 stitches together. (sc2tog, dc2tog) or decreasing.
- Work in the back loop only of a stitch
- Crochet in the round
- The puff stitch (explained in the notes of the pattern)
- Some shaping and color work!
If you are new to crochet and not familiar with any of the above mentioned, please click on the links and follow the easy tutorials! You will be able to make your Crochet Slouchy Hat in no time!!!
Some FAQ and answers:
Can I adjust the size of the Bucket Hat?
This slouchy hat is made to fit the average head size of an adult female. If you would like to make it smaller, you can by decreasing your foundation chain by 10. As long as you work in multiples of 10, you are good to go!
If you would like it bigger, please feel free to leave me a comment down below in the comments section!
What Yarn and Hook Should I use?

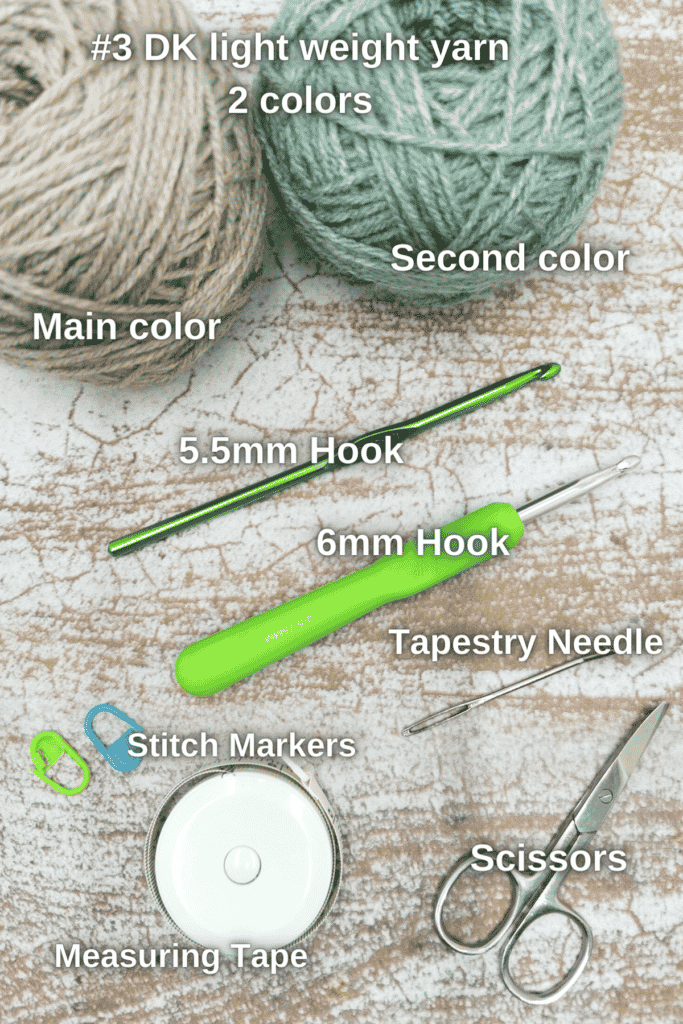
I used #3 DK weight cotton yarn for this slouchy hat. This combo of yarn with the bigger size crochet hooks, make it so you have just enough slouch in your beanie!
I used Kismet Lollipop Dk yarn in the colors Sand and Melange Sage. This is a 100% Acrylic yarn, but you can use any type of DK light weight yarn, just be sure to make a gauge swatch to see if you need a bigger or smaller hook.
I also used a 5.5mm (USI/9) and 6mm (J/10) Boye Crochet Hooks!
If you reside in the US or abroad of South Africa, you can use something like Lion Brand Truboo or Patons Grace yarn, if you use yarn from full 100g balls, you will have enough left over to make another beanie in the same contrasting colors!
When you use something else, then please leave me a comment down below! I would love to know what brands you use.
Let me know if you have any other questions by leaving a comment down below!! 🙂
The materials needed for the Slouchy Hat Crochet Pattern
The full list of materials can be found in the pattern below.
Let’s get started!
Now that you know all that is need to be known, I will not keep you any longer from crocheting The Best Slouchy Hat crochet pattern of 2022.
Remember to follow me on Facebook and Instagram and share your creations with me on all my social platforms. Also pin this on your Pinterest boards if you want to make it again. And also remember to subscribe to my YouTube Channel for easy Crochet Tutorials and also easy to follow videos on my free crochet patterns!
Happy Crocheting!!! 🙂
~Nadine
Did you crochet this pattern? Be sure to leave a comment down below!

The Slouchy Hat Crochet Pattern
About the Pattern
- This hat is crocheted in the round from the bottom up and you will not turn after each round.
- You will start with a foundation chain and connect the chain with a slip stitch to the 1st chain.
- Take care to make sure that your chain is not turned when you connect to the 1st ch.
- For the Dc rows, ch3 at the beginning of each row counts as a dc/stitch
- For the Sc rows, ch1 at the beginning of each row does not count as sc.
- The stitch count of each row is shown between () at the end of each round. Count your stitches!
- Use a stitch marker in the beg of each round if you are not sure where your first st of the round is or if you are a beginner.
- I found it easier to weave in my ends as I crocheted the hat. You’ll save a lot of time!
- SC2TOG (Single crochet 2 together): Insert your hook into center of your next stitch. Yarn over and draw through the chain stitch and up onto the hook so that you have two loops on your hook. With those two loops on your hook, repeat step one into the next stitch. You will now have three loops on your hook. Using your hook, grab yarn and draw it through all three loops on your hook, leaving just one loop on your hook. You’ve just single crocheted two stitches together.
- DC2TOG (Double crochet 2 together): (Yarn over, insert hook in next stitch, yarn over and pull up a loop, yarn over and draw through 2) repeat this one more time, yarn over and draw through all remaining loops on the hook.
- FPDC (Front Post Double Crochet): Work just as a normal double crochet stitch, only instead of working into the next chain space, you work around the vertical post, around the front. Insert your hook from the front of your work to the back and then back out to the front, moving from right to left.
- BPDC (Back Post Double Crochet): Work just as a normal double crochet stitch, only instead of working into the next chain space, you work around the vertical post, around the back. Insert your hook from the back of your work to the front and then back out to the back, moving from right to left.
- Puff Stitch: Place your Yarn over hook and insert your hook into the specified stitch/space, yarn over hook again and pull up a long loop. (Yarn over and insert your hook into the same stitch/space. Yarn over again and pull up a long loop) three more times, Yarn over and pull through all 9 loops on your hook. Ch 1 to close the Puff Stitch. (Very important)
Tools and Materials
- #3 DK light weight yarn 50gr/1.7oz (125m/136yds) in two colors. Main color and second color.
- Size 5.5mm Hook US I/9
- Size 6mm Hook US J/10
- Measuring tape
- Stitch Markers
- Tapestry Needle
- Scissors
Instructions
Slouchy Hat Crochet Pattern:
- With 5.5mm hook:
- Foundation Chain: ch80, join with a sl st into the 1st st made to create a circle. Take care to not twist your chain when you join.
- You will now work in the rnd.
- Rnd 1: ch3 (counts as a dc, here and throughout the pattern), 1dc in each ch around, sl st into the top of ch3 to connect rnd (now and in every rnd unless otherwise stated) (80)
- Rnd 2: ch3, *1Fpdc in nxt st, 1Bpdc in following st; rep frm * until end of rnd, sl st to top of ch3. (end in Fpdc) (80)
- Rnd 3: ch3, *1Fpdc in nxt st, 1Bpdc in following st; rep frm * until end of rnd, sl st to top of ch3. (end in Fpdc) (80)

- Switch to 6mm hook:
- Rnd 4: ch3, 1dc in each st around, sl st to top of ch3 (80)
- Rnd 5: ch3, 1dc in BLO in each st around, sl st to top of ch3 (80)
- Change color to second color
- Rnd 6: ch2, *puff st in nxt st nxt to ch (remember to ch1 to close of puff), sk 1 st; rep frm * until end, sl st to 1st puff st. (40 puffs)
- Change color to main color
- Rnd 7: ch3, * 1dc into top of puff st, 1dc into ch1 (not sp but ch itself); rep frm * until end, sl st to top of ch3. (80) (make sure to count your stitches!)

- Rnd 8: ch1, 1sc (loosely) in each st around, sl st to 1st sc of rnd. (80)
- Change color to second color
- Rnd 9: Rep rnd 8
- Change color to main color
- Rnd 10: Rep rnd 8
- Rnd 11: ch3, 1dc in each st around, sl st to top of ch3. (80)

- Change color to second color
- Rnd 12: ch2, *puff st in nxt st nxt to ch (remember to ch1 to close of puff), sk 1 st; rep frm * until end, sl st to 1st puff st. (40 puffs)
- Change color to main color
- Rnd 13: ch3, * 1dc into top of puff st, 1dc into ch1 (not sp but ch itself); rep frm * until end, sl st to top of ch3. (80) (make sure to count your stitches!)
- Rnd 14: ch3, 1dc in BLO in each st around, sl st to join. (80)
- Change color to second color
- Rnd 15: ch2, *puff st in nxt st nxt to ch (remember to ch1 to close of puff), sk 1 st; rep frm * until end, sl st to 1st puff st. (40 puffs)
- Change color to main color
- Rnd 16: ch3, 1dc in each of nxt 5 sts, dc2tog, * 1dc in each of nxt 6 sts, dc2tog; rep frm * until end, (end in dc2tog), sl st to top of ch3. (70)
- Change color to second color
- Rnd 17: ch1, 1sc in each st around, sl st to 1st st of rnd. (70)
- Rnd 18: ch2, *puff st in nxt st nxt to ch (remember to ch1 to close of puff), sk 1 st; rep frm * until end, sl st to top of ch2. (35 puffs)
- Change color to main color
- Rnd 19: ch3, 1dc in each of nxt 4 sts, dc2tog, * 1dc in each of nxt 5 sts, dc2tog; rep frm * until end, sl st to top of ch3. (60)
- Rnd 20: ch1 (does not count as st), * 1sc in each of nxt 4 sts, sc2tog; rep frm * until end, sl st to 1st st. (50)
- Rnd 21: ch1, *1sc in each of nxt 3 sts, sc2tog; rep frm * until end, sl st to 1st st. (40)
- Rnd 22: ch1, * 1sc in each of nxt 2 sts, sc2tog; rep frm * until end, sl st to 1st st. (30)
- Rnd 23: ch1, * 1sc in each of nxt st, sc2tog; rep frm * until end, sl st to 1st st. (20)
- Rnd 24: ch1 (does not count), sc2tog in each st around, sl st to 1st st. (10)
- Finish off, leaving a long tail.
- Use long tail to sew top of hat by weaving tail in front loop only of each st and then pulling tight to close.
- Weave in your ends securely.
- Add a pom pom to your hat if preferred.
This is THE best hat pattern! I used Sugarwheel by Yarn Bee from Hobby Lobby with a K and J hook. It came out beautifully with great detail and texture. I don’t wear a lot of hats, but I want to make this one again!!
Yay! So happy to hear you enjoyed the pattern Patti! Thanks so much for sharing and for your great review!
Do you have a video tutorial for this?
Working on it Mel!
I’m working in rural Africa right now and have very limited supplies. I only have 5.5 size hook. What would happen if I only used 5.5 for the entire pattern? Will it still work? (I’m new to crocheting)
Hi Anna! Yes, it will still work. It might be a little loose around your head, so I suggest making a chain that fits snuggly around your head and then continuing with the pattern. Make sure to crochet a chain that end on a even number.
I loved this pattern. I used Bulky yarn and a J-10 hook. I love the slouch.
Yay! Happy to hear you enjoyed the pattern Dina! Thanks so much for sharing and for your great review!
Is there a way to make the slouchy part more slouchy ? Without adding a pom pom. I’m wondering if I need to increase any rows?
Hi Kendra! You can repeat rounds 8 to 15 as much as you’d like to make it more slouchy. Thank you so much for your great review!
I tried to download your “Best Slouchy Hat Crochet Pattern”, entered my email address to sign up for the newsletter, and it won’t let me print it. Can you email it to me?
Hi Christian. Sorry to hear you’re having trouble. Is your printer settings set to download or to print? It’s working on my side, so I just need a bit more information to be able to help you.
First time making a slouch hat ! Some of the stitches are new to me but I was able to understand them . The one thing that I’m struggling with is the chaining of ( 80)! I’m lost I went ahead and followed the pattern however the (80) chains is confusing 🫤. I feel that I’m missing something! Can you explain why so many chains?
Thanks Rosemary
Hi Rosemary! Thanks for your question. I used DK/#3 weight yarn and needed 80 chains for the beanie to fit around the average female head. If you’re using a bigger yarn size, you will make less chains to fit around your head. If your using the same yarn size as called for, and the 80 chains do not fit around your head, then you can start with an even number of less chains. Hope this explanation helps!
love this! I made it for a friend. I used some Caron simply soft and Bernat softee baby. I can’t wait to send it to them and see if they like it as much as I do!
Happy to hear you enjoyed the pattern Tara! Thanks so much for sharing what yarn you used and for your awesome review!
I love this pattern! Have you done this with size 4 yarn?
Hi Caleigh! Sure! Using a 6mm hook for the brim and 6.5mm hook for the hat. You can go ahead and make a chain an even amount as long as the size you require. Then follow the pattern as written and your beanie will be a bit more bulky, but will look just as great.