How to crochet: For Absolute beginners
Welcome! I’m so glad you decided to learn how to crochet! This is a craft that is super easy and fun to do because when you get the hang of it you can make just about anything. All you need to do is get used to holding your hook and your yarn, make a slip knot, crochet a chain and your good to go! In addition you will also learn how to crochet one of the basic crochet stitches, the single crochet.
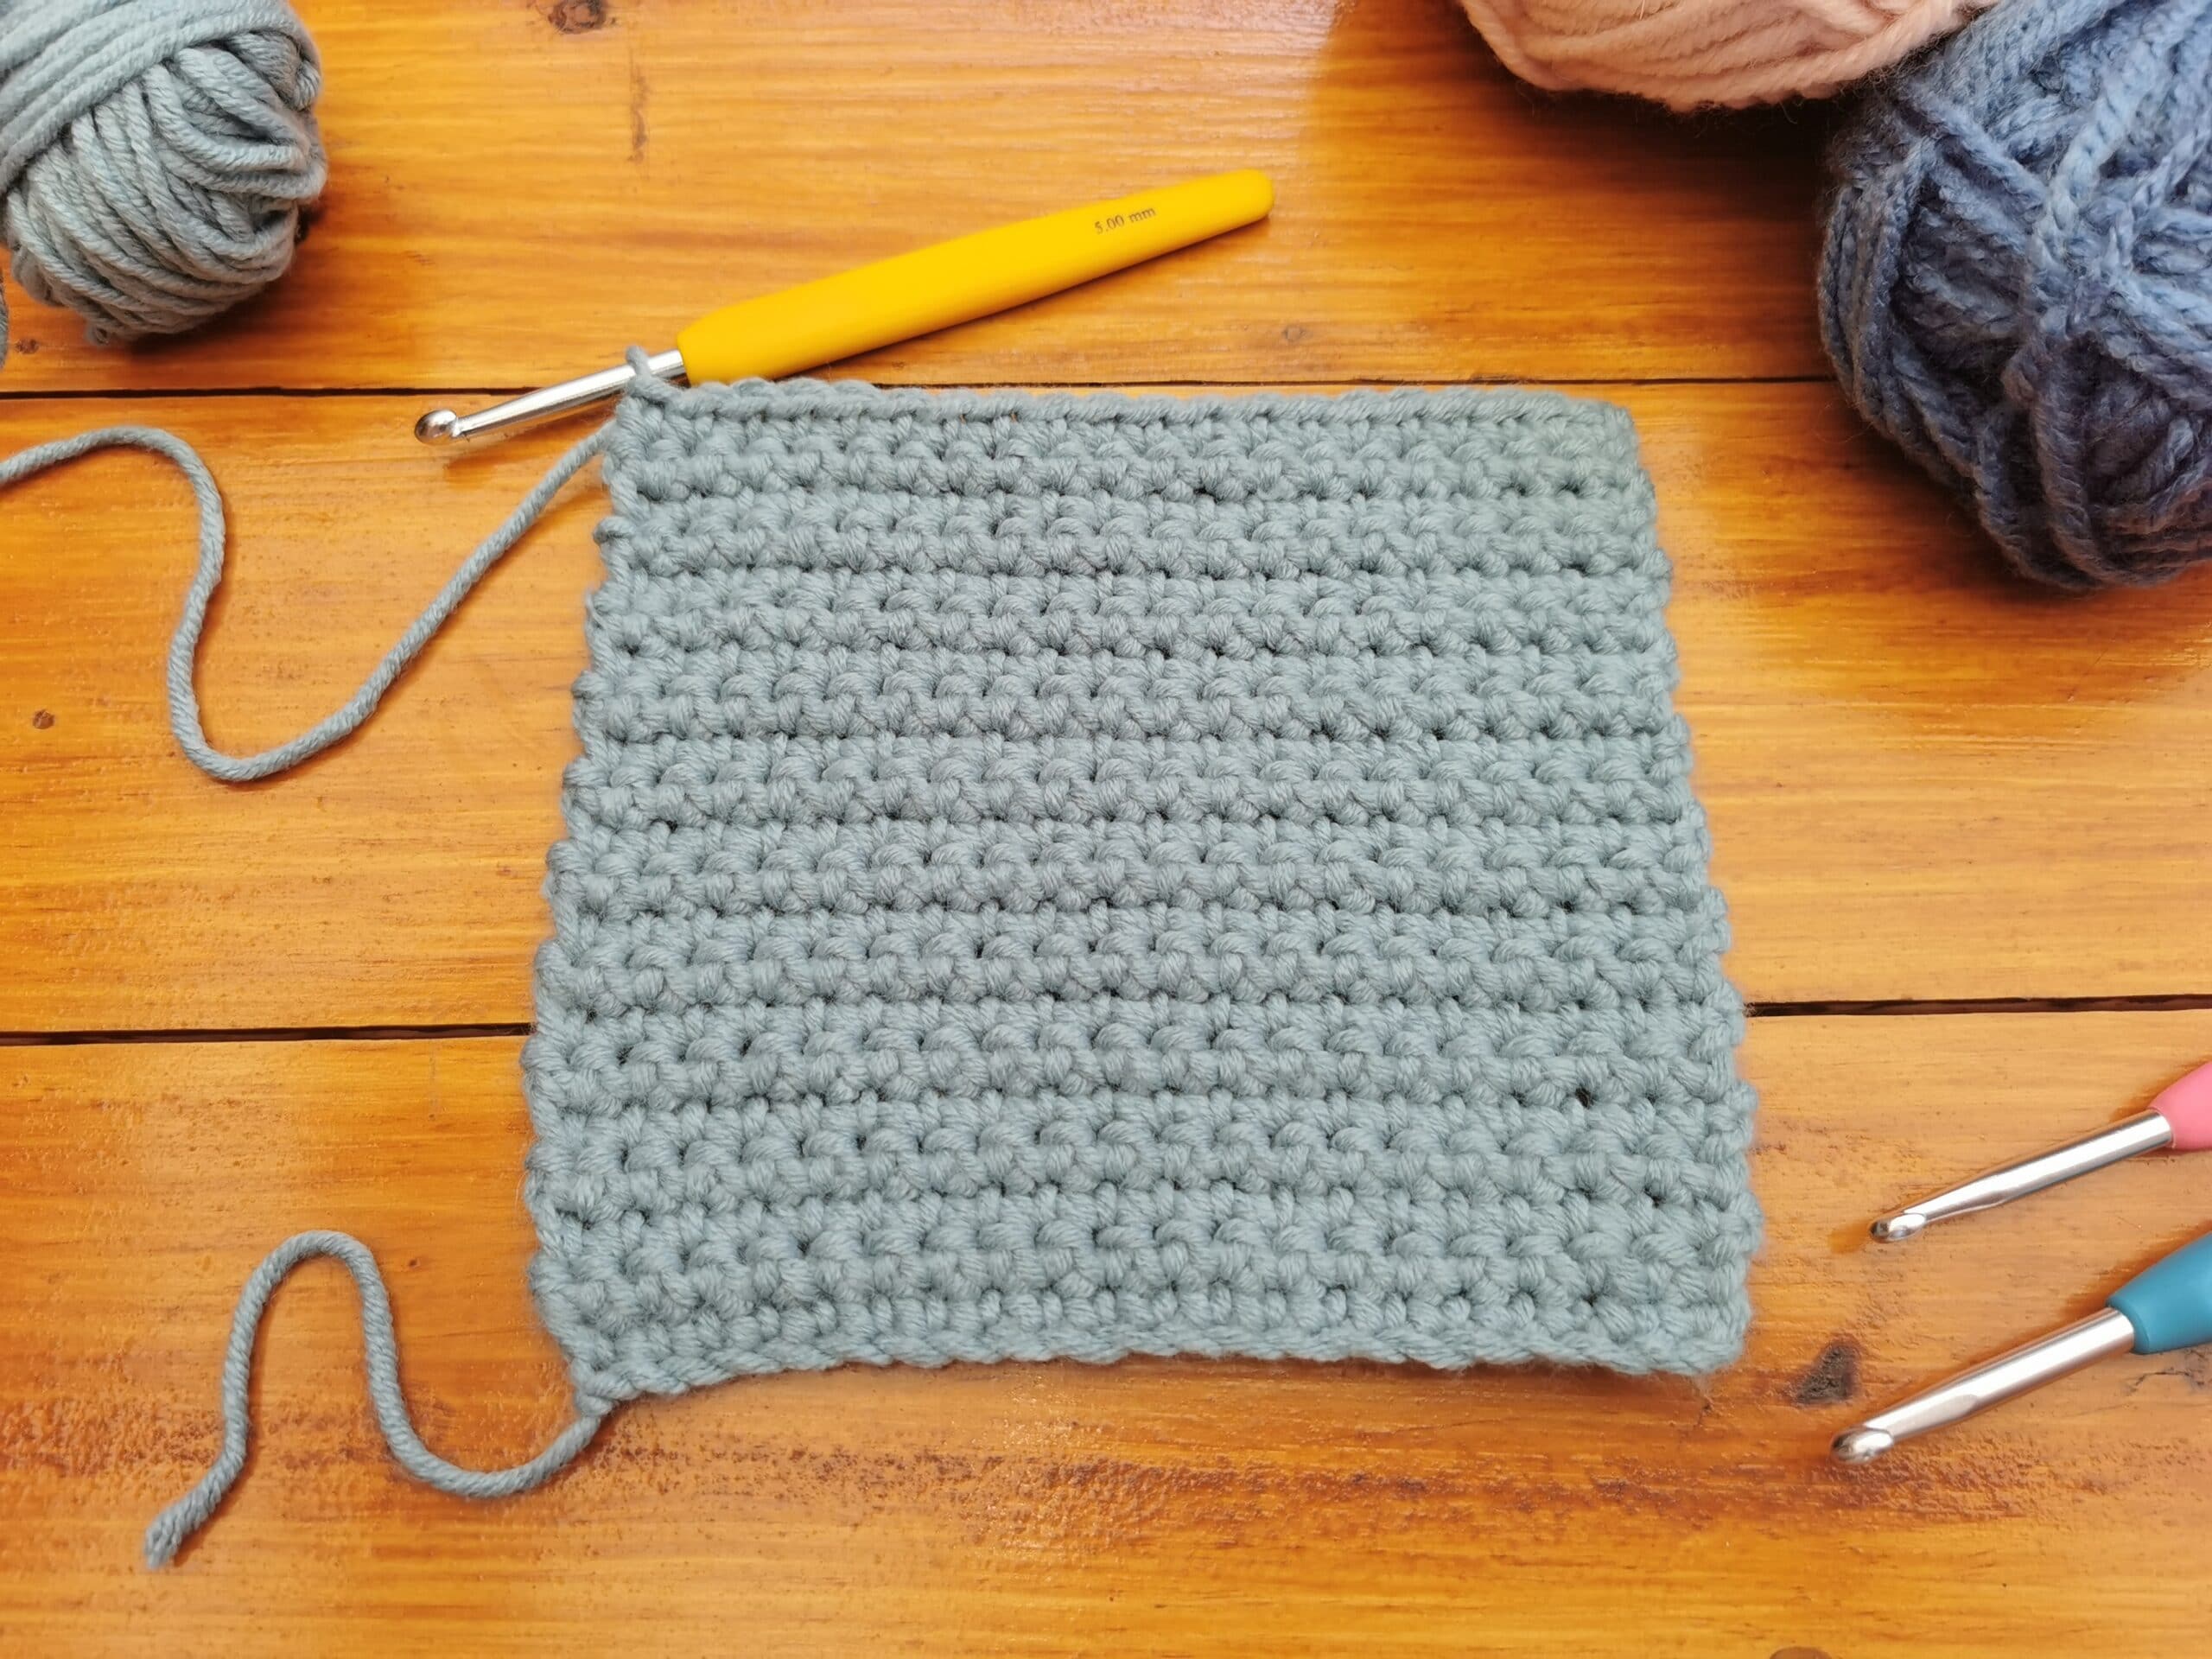
In the beginning of my crochet journey I watched a ton of videos and tutorials on you tube to make sure I get this right. I’m sort of a perfectionist and wanted my projects to look exactly like they did in the photo’s and videos. However, practice makes perfect! You need to make some sample squares in the beginning to get the feel for how to hold your hook and yarn and to make sure you understand your tension. Don’t worry if you end up with a lot of squares! You can connect them and make a blanket at the end! How cool is that?!
In this written tutorial I am going to show you how to hold your hook and yarn, make a slip knot, crochet a chain, single crochet and to finish off and weave in your ends.
What you will need to start:
Most importantly you will need yarn, the recommended size crochet hook, scissors and a yarn needle.

I recommend that you start off with a thicker yarn and the hook recommend by the yarn label.
That said, how do you know what to look for when you go yarn shopping? On the yarn label you will see the number showing what size your yarn is, it looks like this:

This is the label showing what size your yarn is. When you start, you will look for the size 4 and up.
The yarn label usually states what size hook you will need. For size 4 yarn you will need a hook size 5.5mm or size I-9.
How to hold your hook:
Firstly everybody is different. There are no right or wrong way for holding your crochet hook.
But there are two common ways for holding it, the knife hold and the pencil hold.


I use the knife hold as it feels much more comfortable for me. But it is totally up to you!
How to make a slip knot:
Before we get to how to hold your yarn, we are going to make a slip knot and place it on your hook!
The slip knot is most commonly used to start your crochet project. You will need to know this, as almost all patterns don’t instruct you to make one at the beginning of the pattern. If you had to do something else, like when your making toys/amigurumi, the pattern will call for a “magic circle”, but we’ll get to that in the next tutorial.
Here’s how to make a slip knot:
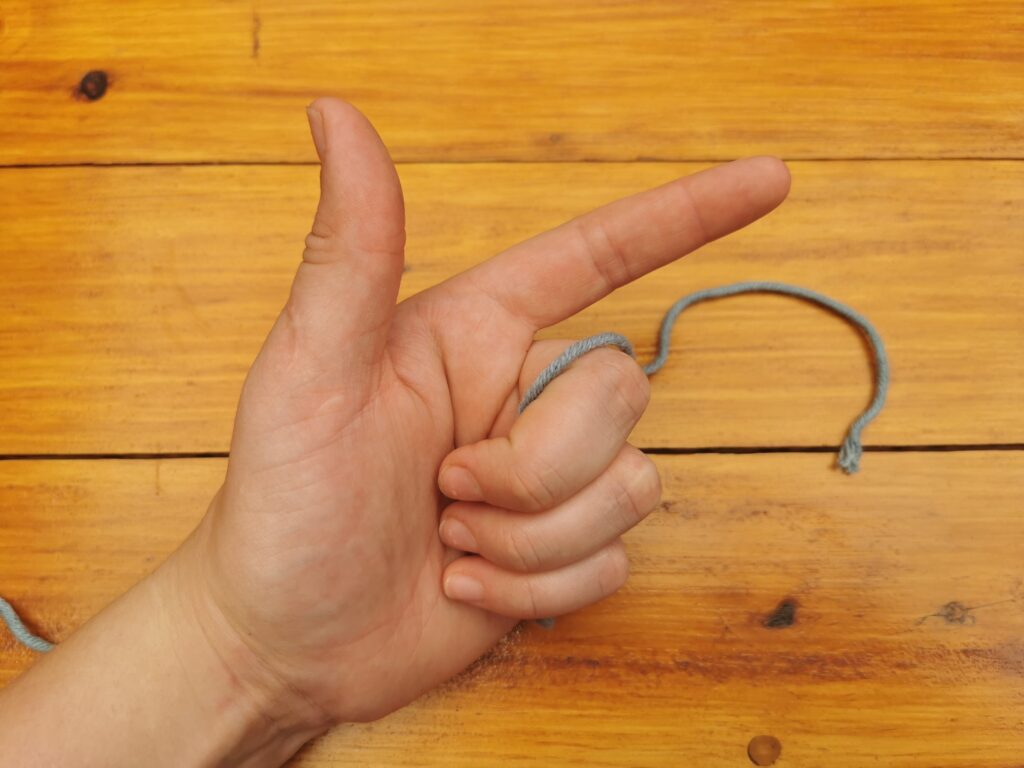
- Measure out around 3 inches of yarn. Grab the yarn with three fingers and point your index finger outward. Just like making a finger gun! 🙂
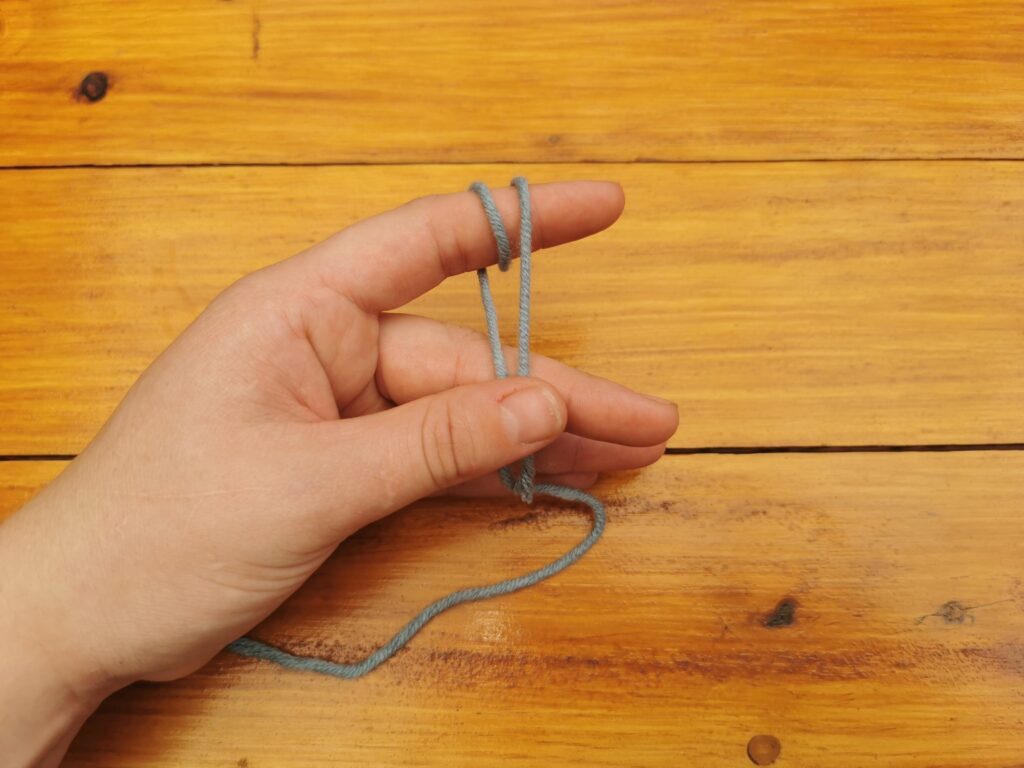
- Wrap the yarn over your index finger once with the short end at the front of your finger.

- Wrap the yarn around your finger once again, so that you have two “loops” around your finger.
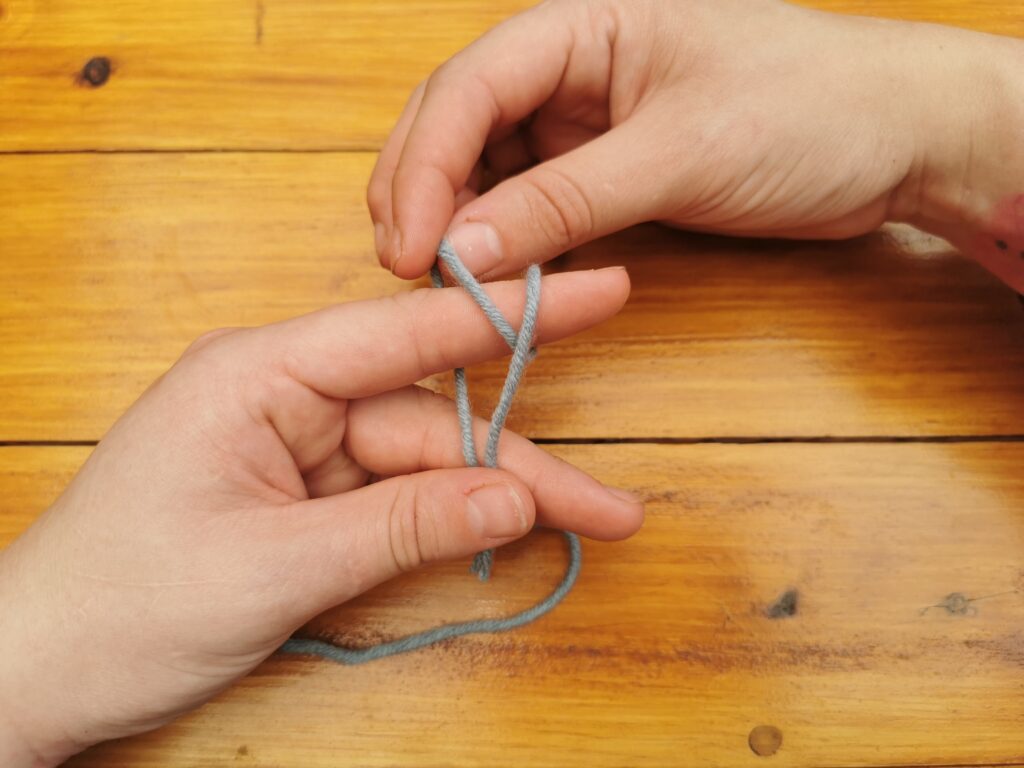
- Grab both ends, the short tail and the long tail (attached to the ball of yarn), also known as the working yarn, with your thumb and middle finger.

- Take the back loop and pull it over the front loop, but don’t pull it off all the way.

- Now take the back loop and pull it off your finger completely and tighten the knot. Make sure not to make it super tight because you want the slip knot to be able to slip up and down.


Ta-da! You made your first slip knot!
Insert your hook into the slip knot and pull on the working yarn. Make sure the tail end faces towards the hook.


How to hold your yarn:
Okay, we’ve learned how to hold your hook and how to make slip knot, now we conjure on to how to hold your yarn.
Isn’t this exciting?! 🙂
The way you hold your yarn determines how tight or loose your tension will be. Whether you are right handed or left handed, your hand needs to be relaxed holding the yarn. Not too tight or too loose.
This is again, is totally up to you, but this is the way I hold mine.

- With your slip knot connected to the hook, hook in your working hand – place the yarn between your middle and index finger.
- Wrap the yarn around your pinky, coming back up to the front of your index finger. Then wrap it to the back of your finger.


Again, you can determine how you hold your yarn so that it flows easily through your hand as you crochet. Whatever you are comfortable with.
How to make a chain:
You’ve come so far already! Crocheting your first chain can be daunting because it still feels a bit weird.. But you will certainly get the hang of it the more you practice!
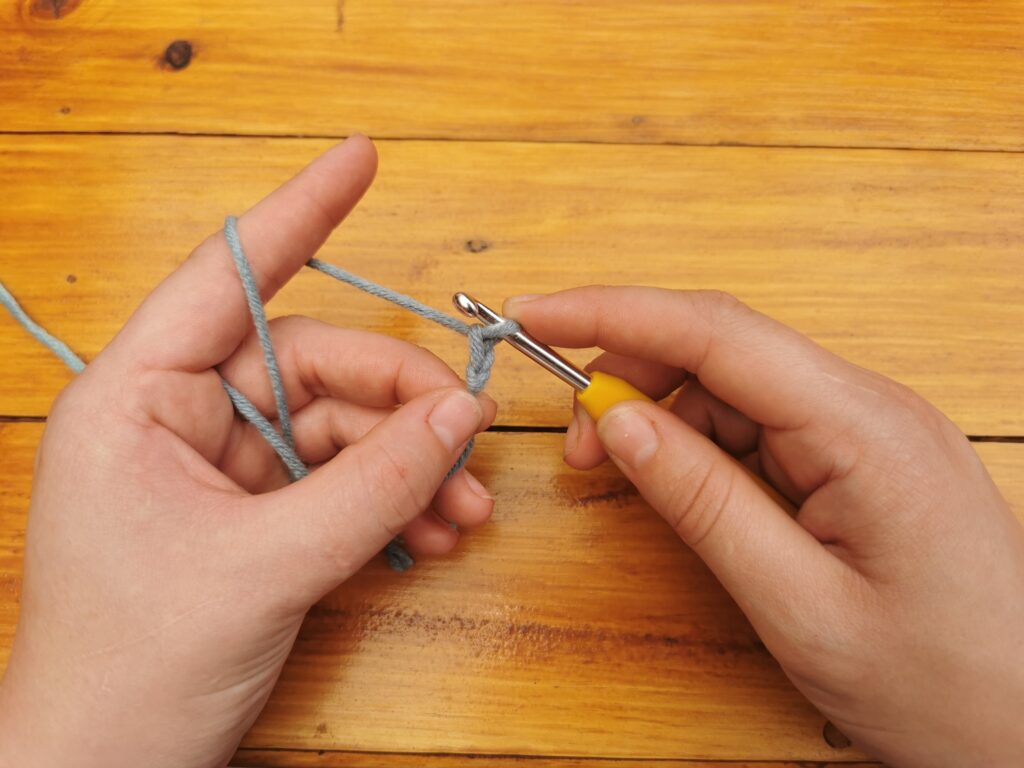
So you have your slip knot on your hook, now you need to hold the slip knot in place with your thumb and middle finger against your hook.

- To make a chain, bring your yarn over your hook from back to front and grab it with your hook. Pull the hooked yarn through the slip knot.


And that’s it, your first chain! Yay!! Repeat this step until you have 21 chains. The loop on your hook does not count as a chain. Your chain should look something like this:
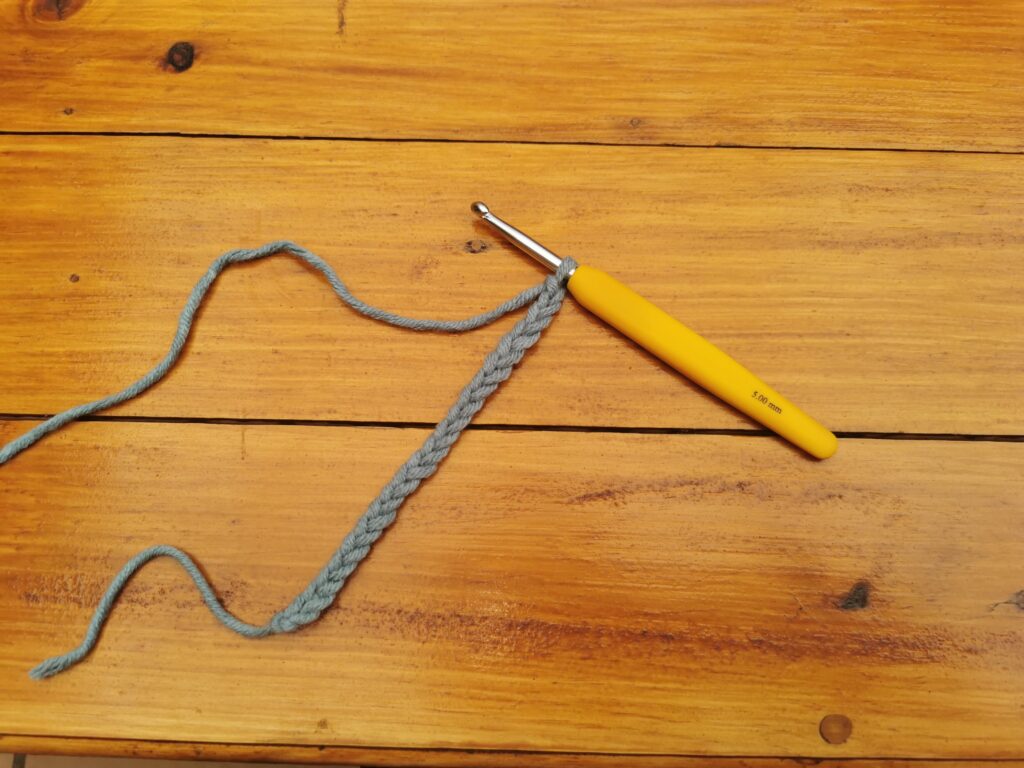
For the chain you need to remember that practice makes perfect. Your chain needs to be loose enough so that you can see through the chain. You will notice if it is too tight when you work into the chain and can’t fit your hook through the chain. If your tension is still a bit too tight, you can switch to a bigger size hook. This will make the chain a bit looser.
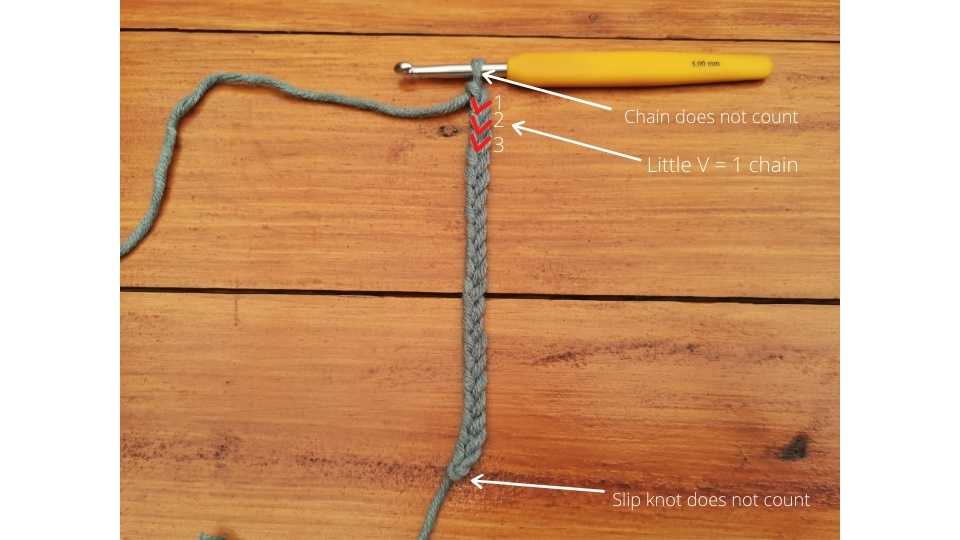
Let’s take a closer look at your chain…
The picture below shows how to count your chain stitches. For the next part you will work into these stitches.
Still a bit confused? 🙂
I made a tutorial on YouTube that shows you everything I just mentioned above in a quick 8 minute video!! (Yay!!!) Click here!
Remember to subscribe to my YouTube Channel and click the notification bell to be notified when a new video is posted!
The single crochet
Okay, lets learn how to crochet the single crochet stitch!
Click here for the YouTube Tutorial! 🙂
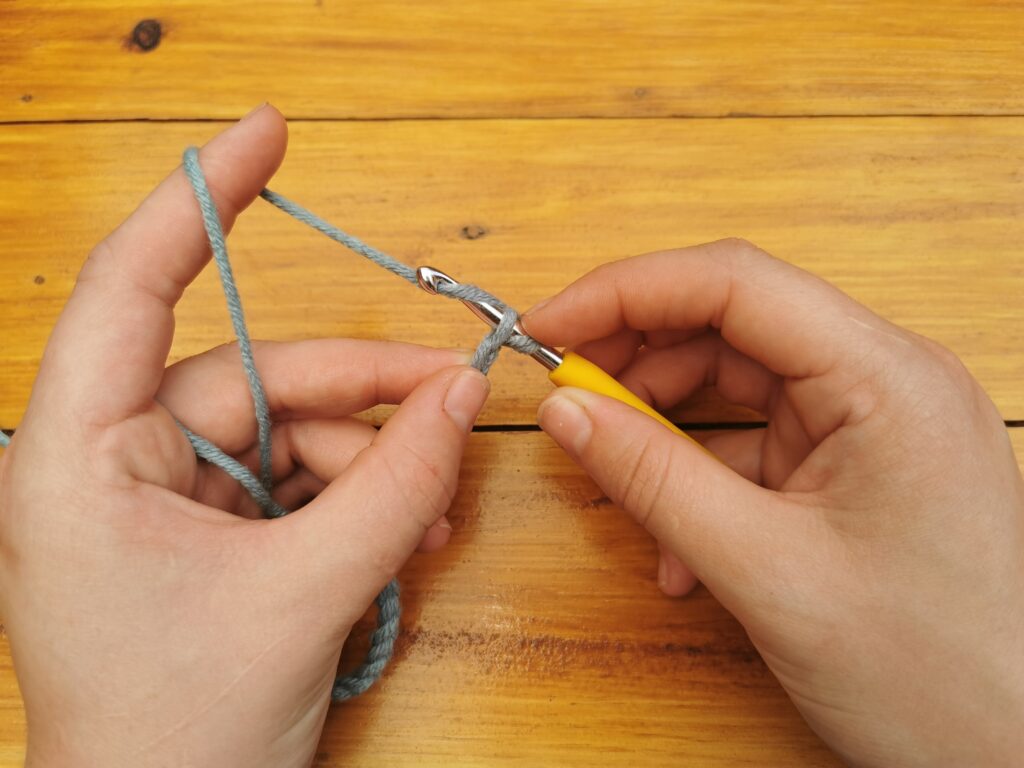
Keep an eye out on how I hold my chain between my middle finger and thumb, as you work down your chain move the work down using your fingers.
- Skip the first chain and insert your hook into the center of the next chain.


- Bring your yarn over your hook from back to front and grab it with your hook (also known as Yarn over), and pull through the chain and up your hook. There should be two loops on your hook.

- Bring your yarn over your hook from back to front and grab it with your hook, and pull through both loops on your hook. One loop remains on your hook. You’ve just made your first single crochet!


- Continue to make 19 single crochet down the entire chain. Your chain of single crochet should look something like this and you should have 20 single crochets in total:

Moving on to the next row:
- Now, to start crocheting on the top of the chain you need to chain 1 (yarn over, pull through the loop on your hook). This chain 1 is the turning chain. The turning chain helps to keep your sides of your work straight.

- Turn your work the same way every time. It doesn’t matter which way you turn your work, as long as you turn it the same way every time.
- To continue down the row, insert your hook into the last single crochet you made in the previous row. Have a look down below. you will see that this is the single crochet next to the chain 1.

- Notice in the picture above, how the stitch looks. You should put your hook through both the front and back loop of the stitch. You will see that it looks like a V.
- Yarn over and pull through the stitch, you have two loops on your hook.


- Yarn over and pull through, and you’ve completed your single crochet on the second row.

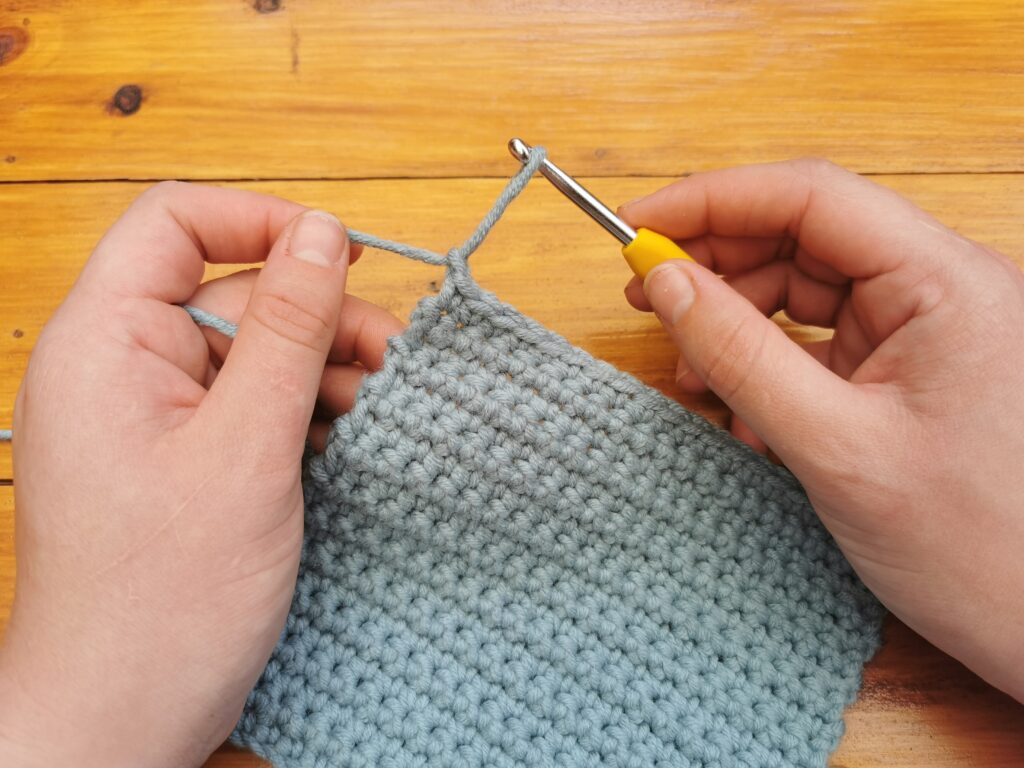
And that’s about it! You can crochet! So if you want to use this square as just a sample piece, you can practice how to the weave in the ends too! Below I’ll show you how to finish off and weave in your ends!
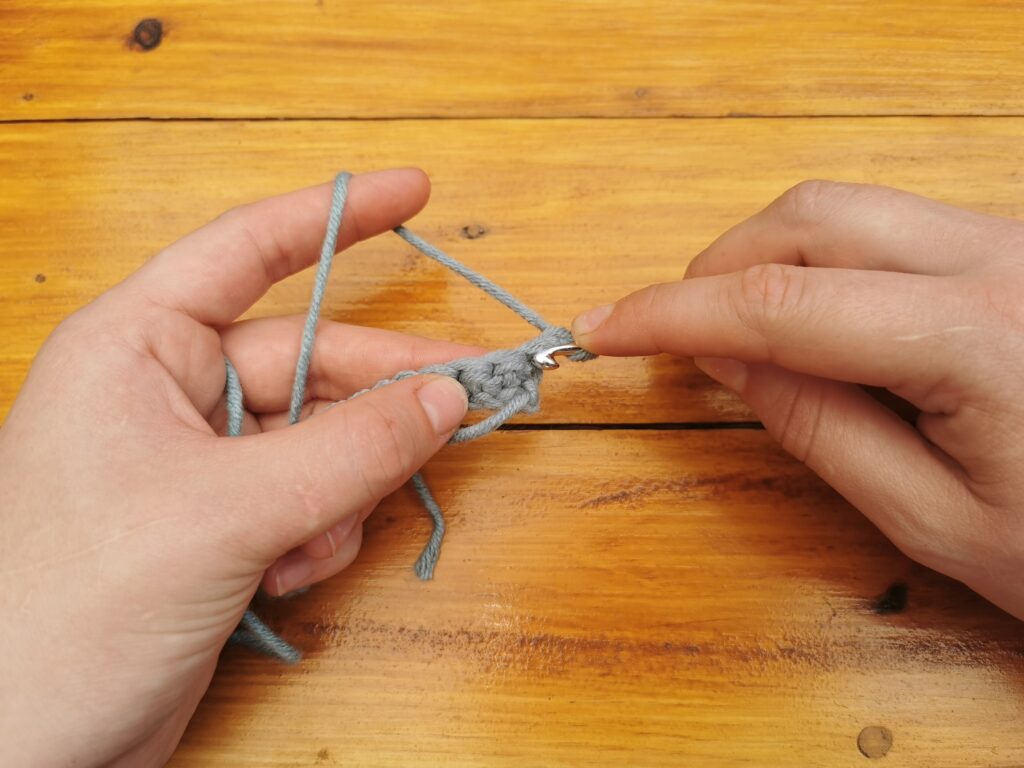
Finish off and weave in the ends
Cutting the yarn is the most satisfying feeling (other than seeing your finished product of course).
Patterns will call for FO / Finish off which means the dame thing as cut your yarn and tighten the loop. Below are photo’s of the process for both finishing off and weaving in the ends. (It’s really super easy)

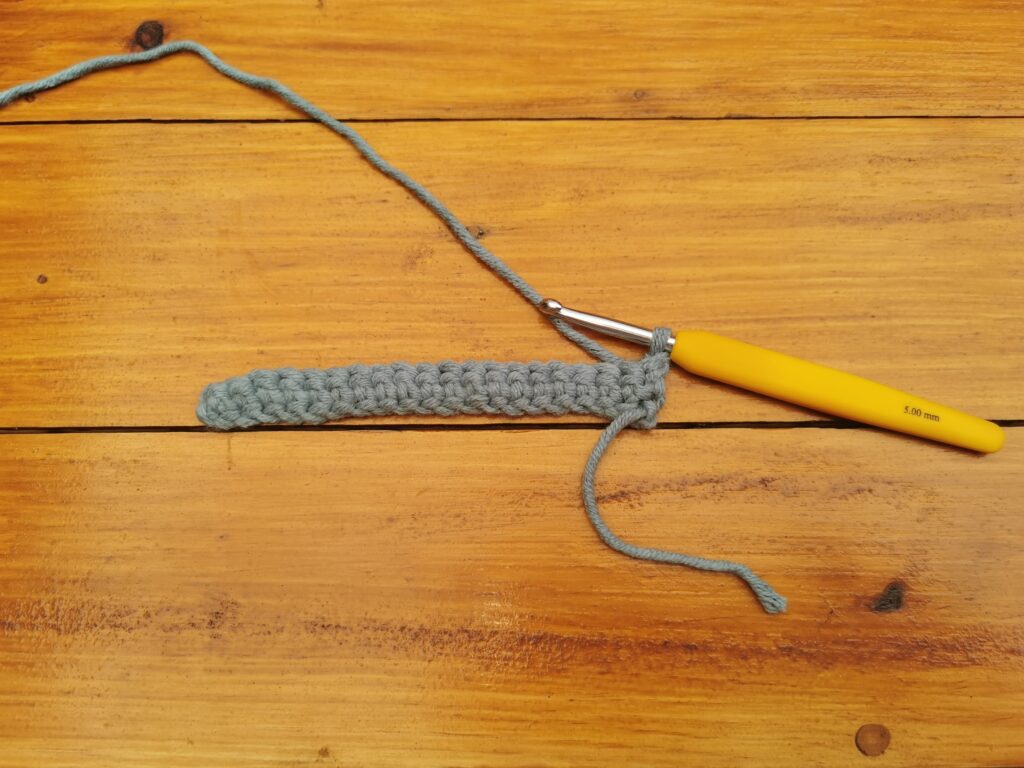
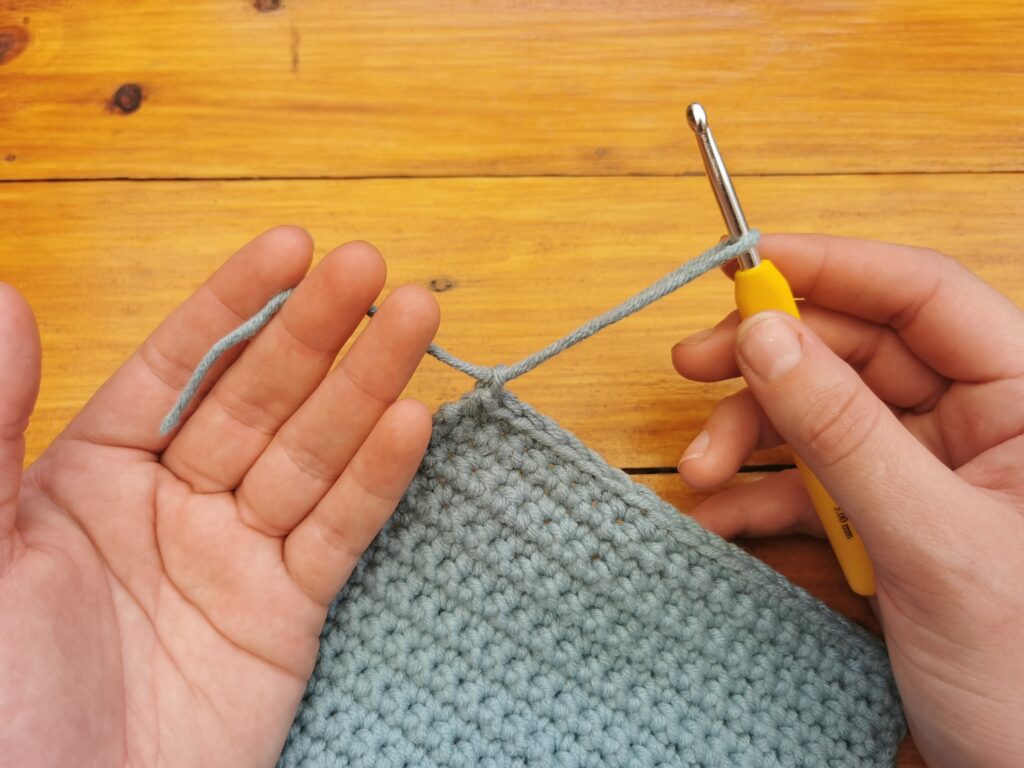
At the end of your project, yarn over like for when you make a chain 1.
Pull the loop about an inch outward.
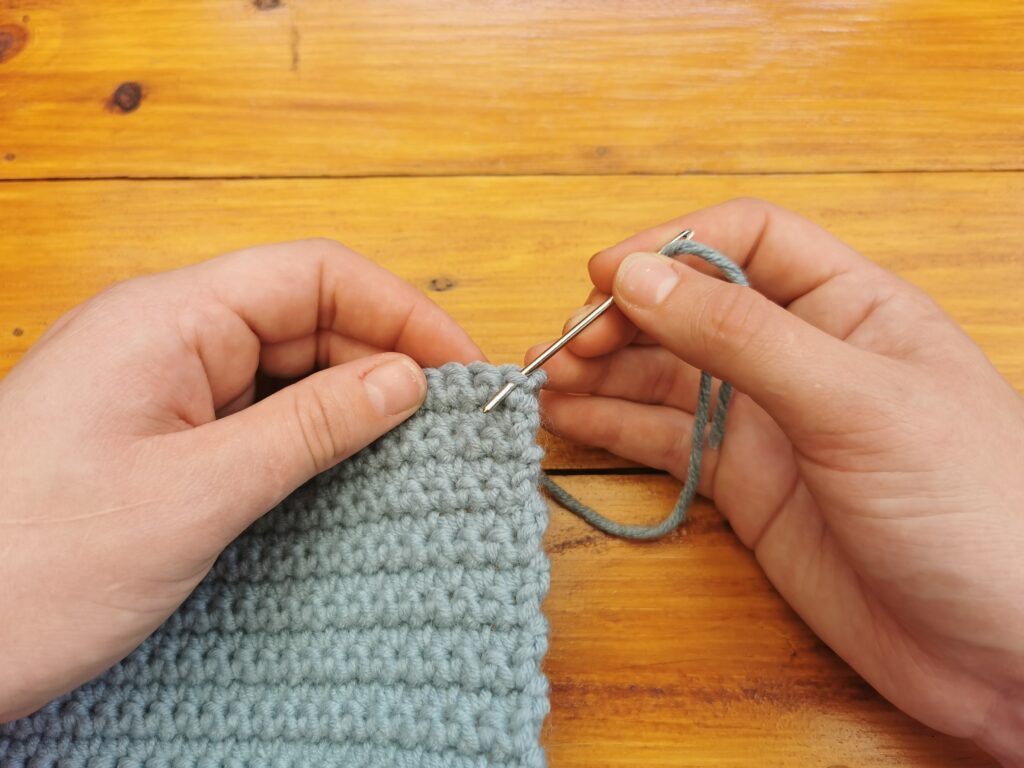
Keeping your yarn on the hook, lay down your project and measure about 2 inches on the working yarn. Cut the yarn at the 2 inch mark.
Now take your hook and pull the yarn completely through the loop.
Weaving in the ends

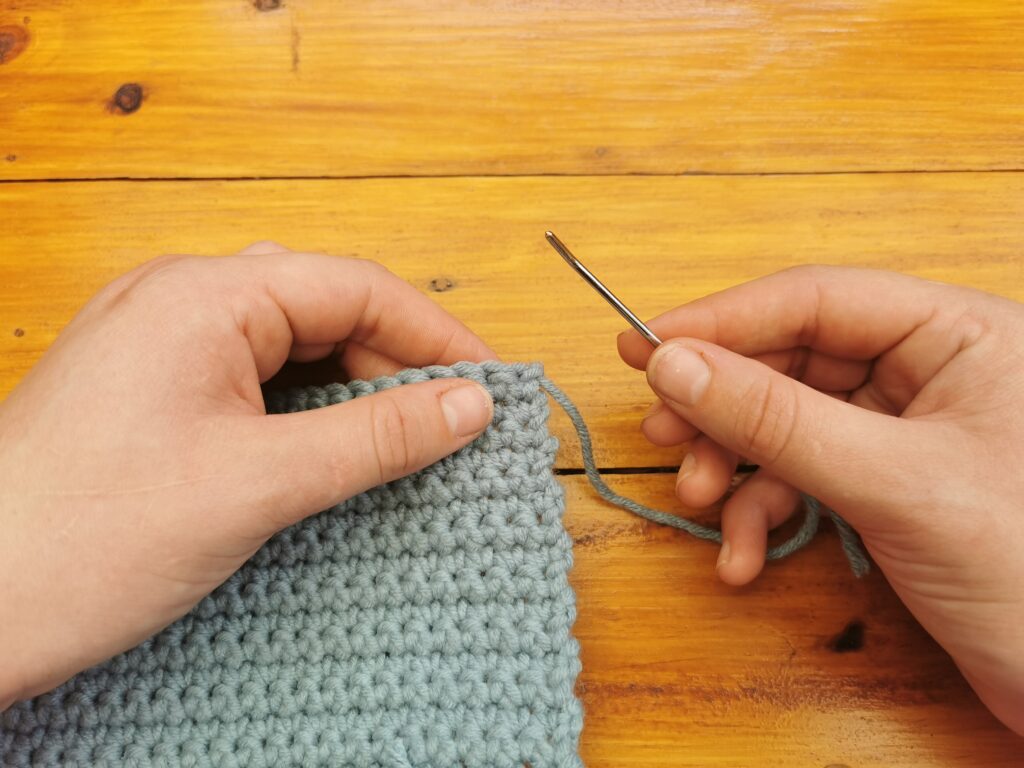
To weave in the ends, push the piece of yarn through the eye of the yarn needle.

Pull the yarn through enough so that it is long enough for you to grab a hold of.
I usually go through the back of the first stitch to get to the bottom row.

Insert the needle through the top of the stitch downward, making sure to not go through the other side.
Pull the needle through but not to tightly as you don’t want your work to curl.

Weave in the needle into the bottom row where your yarn came out.
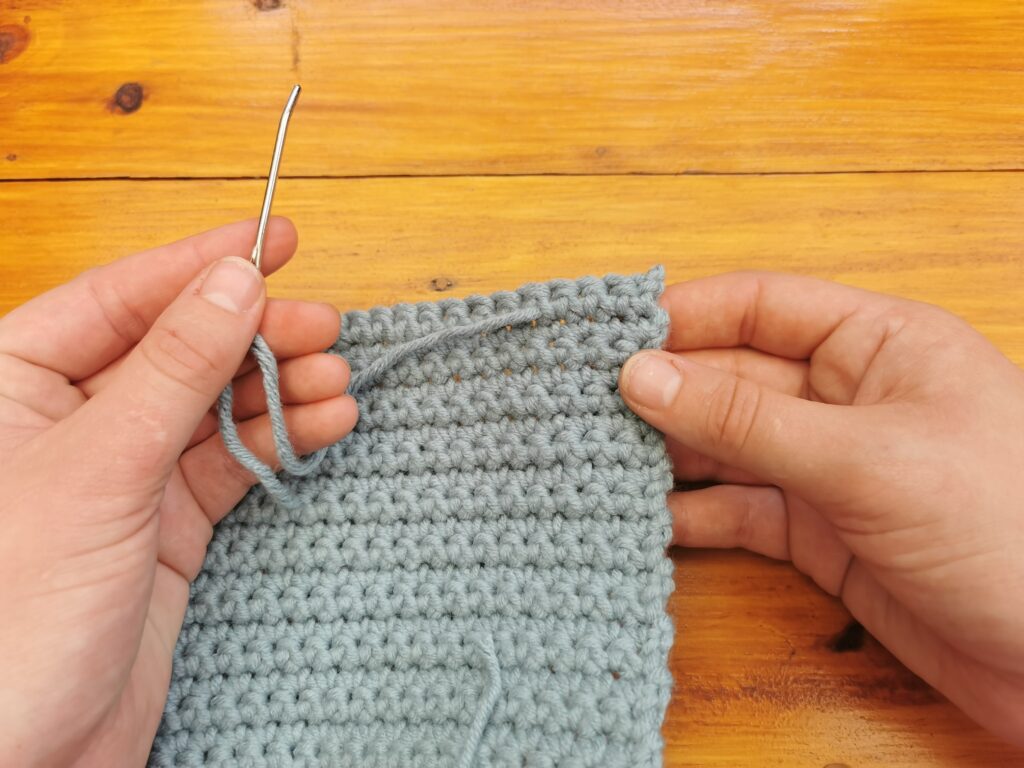
Pull the needle through, again not to tightly.

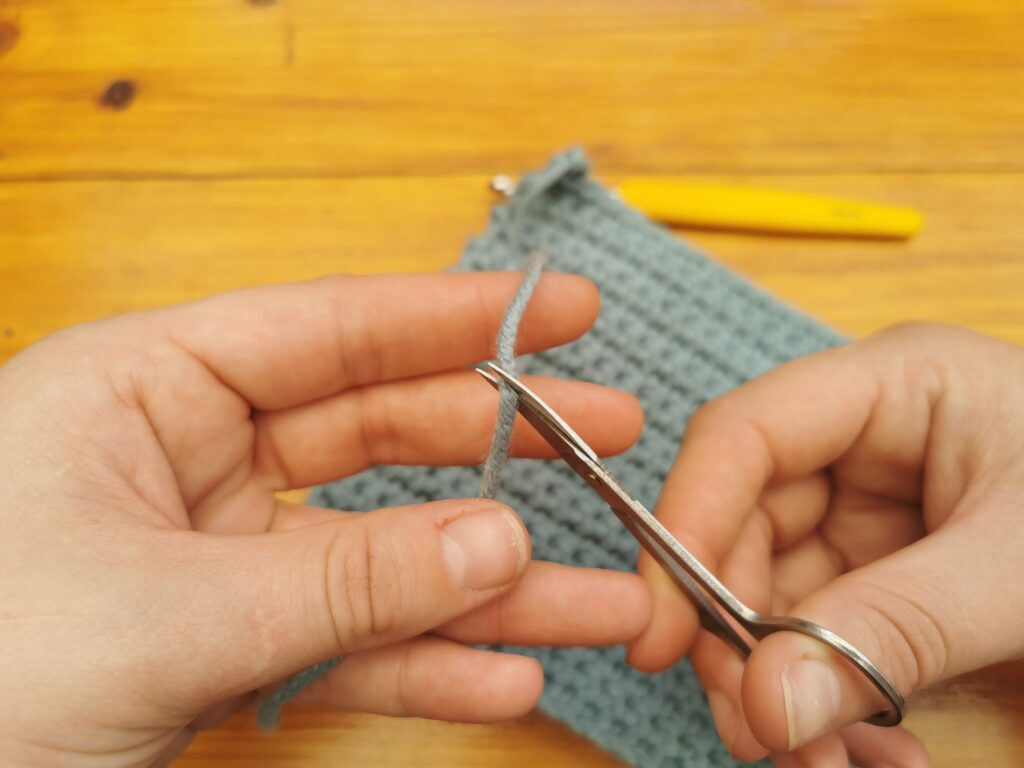
Take our the needle from the yarn and cut the yarn close to your work. If a little piece shows, you can stretch the row a little until it disapears.

And that’s it! 🙂
You can now continue to practice the single crochet by making more squares for a blanket / throw.
In conclusion, I really enjoyed creating this tutorial for you! Please feel free to comment if you have any questions and don’t forget to follow me on all my social media platforms! Also, subscribe to the newsletter so you get all the newest tutorials and best of all free patterns!
I hope to see you at the next tutorial!
Wow, this is awesome, thank you for making this. I have been trying to watch videos but this is easier for me!
Happy to hear the post helped you Erika! Thanks for your awesome comment!
I had never crochet before, and this is the first source I searched up, and gave me an idea of crochet, but if you are going to stop crocheting, and continue the next day, are you suppose to just leave it , or do like a special knot?
Thank you!!!!
Hi Paislee! So glad to hear you decided to start crocheting and that’s a great question!
When you want to take a break from your work, you can remove the loop from your hook and put a stitch marker or a bobby pin on the active loop. Then when you’re ready to crochet again, you can remove the marker and then insert your hook in the loop and continue to crochet. Hope that helps!
Really helpful! I hadn’t crocheted in a long time, and I wasn’t very good before. After your helpful instructions, I picked it up again properly and have started making a (much better looking) blanket. Can’t wait to see the finished project when I’m done!
That’s awesome Laura! So happy I could help. Please share your finished blanket with my on Instagram. I would love to see how it turned out!
Mine keeps coming out crooked and the sides bent and curled what do I do?
Hi Slay Queen! Make sure to use stitch markers in your first and last stitch of your row. This will help you to locate those stitches and it will help your work not turn crooked.
Your instructions are very easy to understand and have helped me a lot. I want to thank you because I have tried to figure it out on my own for a long time and I was doing it wrong and the hard way. I’m anxious to practice now and to keep learning more!!!!
That’s amazing Susie! I’m so happy to hear that. Hope you enjoy the journey as much as I did!
Is this English or American stitches
Hi Diane! This tutorial is in US Terms.
thank you so much. I’m so excited to starting my blanket.
You are so welcome and I’m excited with you!! 🙂
please make a discription for learning to crochet LEFT HANDED. It would be great if it was done exactly like this one.
thankyou in advance.
Hi April! Thanks for your suggestion! I’m working on that and will hopefully have the post available soon!
thank you so much this was so helpful! quick question though. once you have a bunch of little squares how do you turn them into a blanket?
Hi Olivia, once you have a bunch of little squares you can either connect them using a yarn needle and some yarn and sew them together or you can crochet them together with your hook. Look out for my tutorial on You Tube coming soon!
Thank you for sharing your talent and in a way I can better understand . I look forward to proceeding to your next lesson.
Thank you so much for your kind words! I hope your crochet journey will be amazing and I’m so happy to be able to help you along the way!
Thank you for the excellent instructions! You cleared up a couple of mysteries for me 🙂
That’s great! Thank you for your kind words!!
Thank you for the tutorials! I cannot really crochet but your videos are helping!! Thanks
Hi Ginny! I’m so happy the tutorials are helping! Keep on practicing and you will be crocheting in no time!
can you show a tutorial on how to make the skeleton ribcage vest??
Thank you so much for teaching us the basics for beginners. It helps a lot. Step by step. Great teaching skills. What is the basic rule for turning, and keeping from missing a stitch. I have trouble with that. Thanks
Hi Gloria! Thank you for your kind words! They mean so much to me!:)And I am so happy to help you! The basic rule on turning is to always turn in the same direction which is, if you are right handed, from right to left (like turning a page in a book), so that your working yarn is on the back of your work. To keep you from missing a stitch – try to keep count of your stitches (count every stitch) and use stitch markers in your first and last stitch to help you see the stitch better and to keep you from missing those important stitches and your edges will be neat and straight every time! Hope this helps! xxx
Haha I have a rectangle not a square but the stitches look the same. Hoping this will lead to a blanket someday. Thank you
🙂 Keep on practicing and you will be able to make anything your heart desires!!
Hello there. I like to learn, and I’m like a sponge. BUT I’m left handed. Can you make a video for left handed persons like me? I would really appreciate it.
Hello Brigitte!! Thank you so much for reaching out! So crochet works just the same for lefties than for righties 🙂 Then only thing that is different is where right handed people go from right to left, you will go from left to right. I will definitely be making a video in the new year and will make it for both left and right handed people. I will also update this post next week that will include instructions and pictures for lefties! So keep an eye out for next week! 🙂 Have an awesome day!!
Thank you so much for this, I’m a beginner. I just realized I’ve been making a lot of mistakes in crocheting from when I was doing it in my younger days. Lol
I’m so glad I could be of help Amara! Keep on practicing and you’ll be able to crochet anything you set your mind to!
xxx
Thank you very much! I am absolute beginner and I am happy to find you <3
Wow that’s great! I’m so glad I can be part of your crochet journey! Keep on practicing and you will be a pro in no time! 🙂
Amazingly detailed and made easy tutorial ,I learned and made the whole pattern with your tutorial. Absolutely loved it ,ty so much ❤, want to learn more specially how to make sweaters.
Thank you for your wonderful feedback! I’m so glad that I was able to help you! Keep on practicing and you will be able to crochet just about anything in no time!
Your pictures look great! I’m thinking I just might be able to do this!
Thank you for the compliment Kim! You can do it!! Practice makes perfect!
This was SO helpful! You’re great at teaching. My grandmother bought me my first yarn and needles a few years ago and I never really got past 1 chain. Tonight, I was able to do a couple rows thanks to your pictures and instructions. It was a lot less daunting than I remember. Progress!
Thank you so much for your kind words!! I’m so happy to be able to help!
I take it u repeat row 1 and 2 until deserved length
Hi Sebastian! Yes, you repeat row 1 and 2 until you have your desired length.