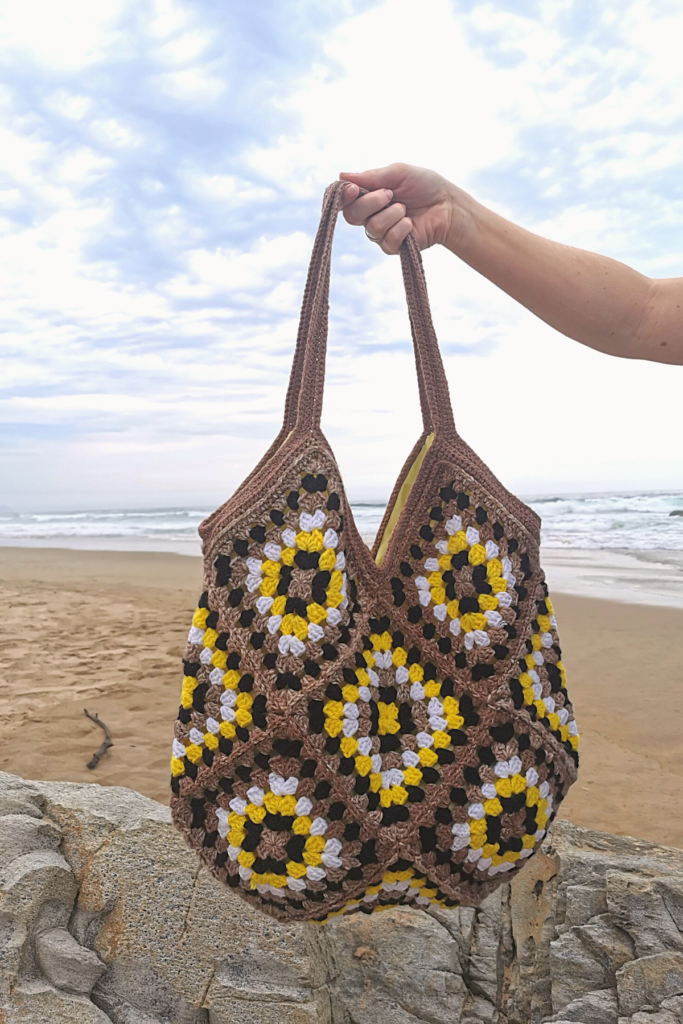
Granny Square Tote Bag
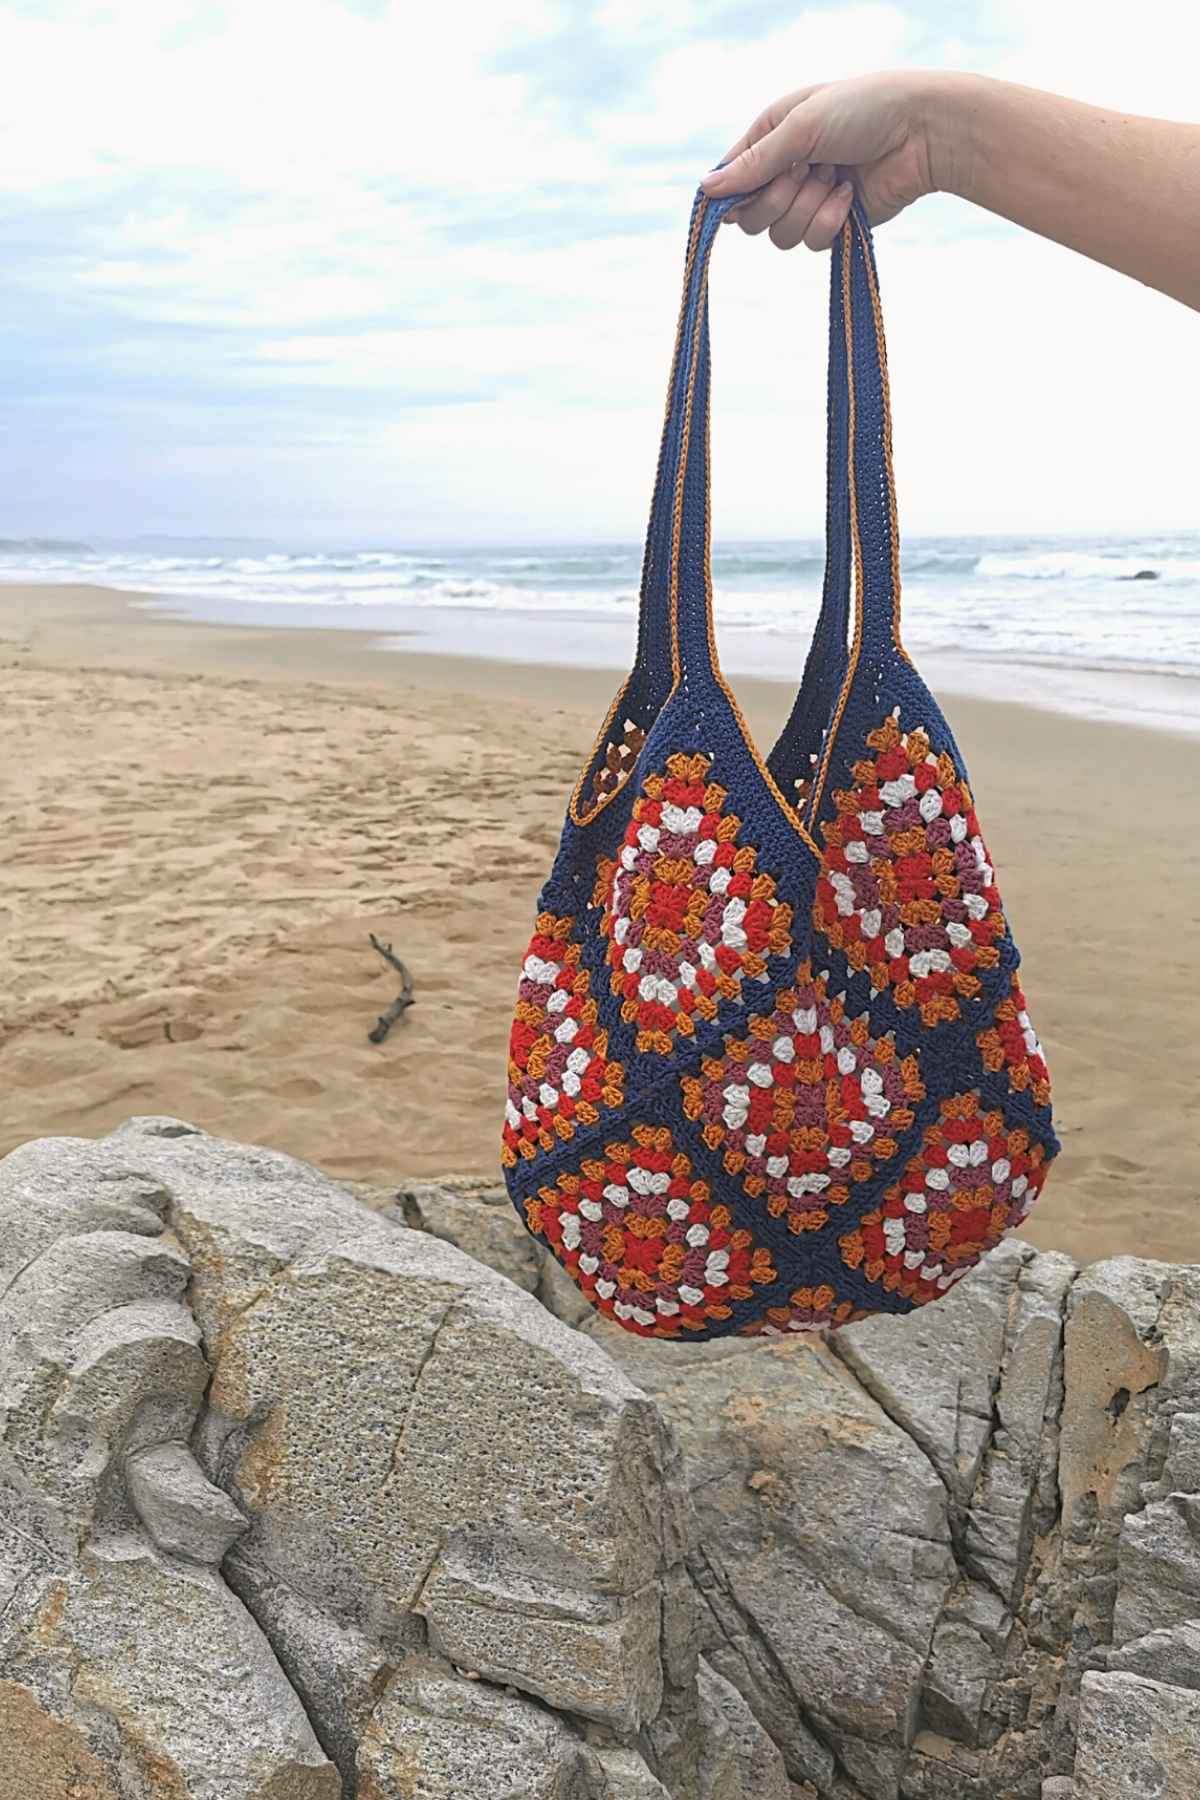
Crochet once again showed me how you can make just about anything when I made this Granny Square Tote Bag! It’s super easy to make and by adding just the right amount of pizzas (insert Jazz hands), you end up with a beautiful bag that is not only on trend, but definitely useful!
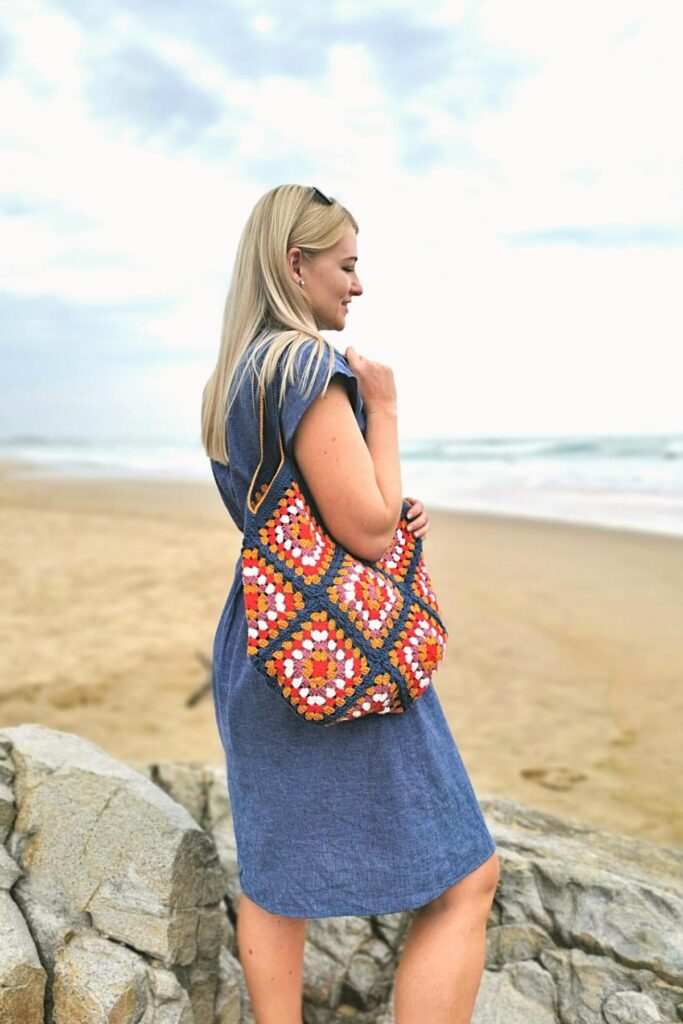
This free crochet pattern is part of my latest crochet tutorial which I released not that long ago. By making these granny squares you get to practice your crocheting and you get the satisfaction of making something you can use afterwards! Use it as a WIP (work in progress) bag, a shopping bag or just a general bag to store your left over yarn in.
Let’s dive into the deeds:
Before you start with this beautiful Granny Square Tote Bag Crochet Pattern, here are some important things to know and some background around this pattern.
The Detail of the Granny Square Tote Bag Crochet Pattern
So last year while I was still working full time, I made granny squares with my left over yarn and packed them away as I finished them. Not knowing what I would do with them in the future. This is something I found was a good way to work through all the left over skeins/balls of yarn I had.
Fast forward a year later and now I am releasing a crochet pattern using these same granny squares. I can’t believe my blog is one year old! Time certainly has flown by – and I wouldn’t change a thing! 🙂
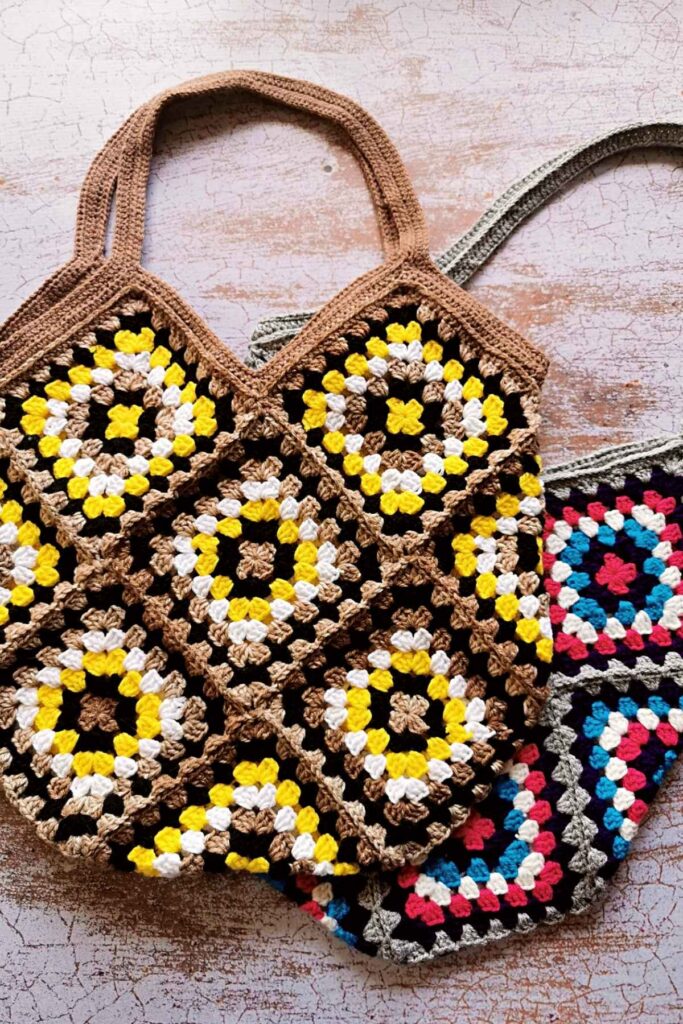
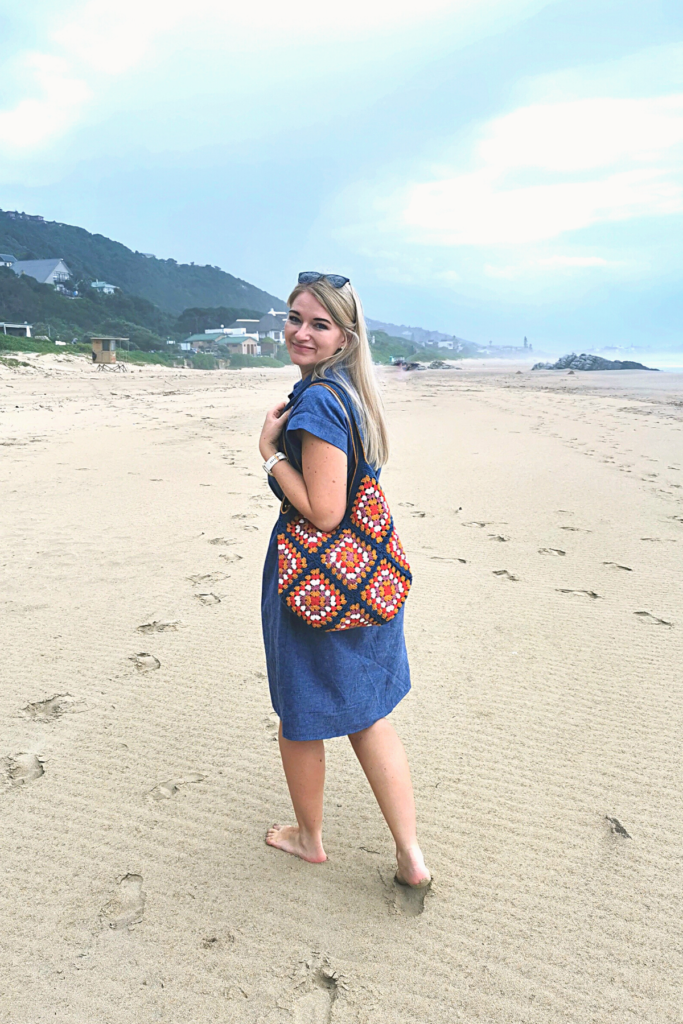
Using the basic Granny Square, this pattern is so easy and versatile! You can make this bag in any color combo or you can even make it in solid colors! Isn’t that neat? You can even use any yarn and any hook! This easy crochet pattern can be used as a guide to help you be more creative in your crocheting!
*Disclaimer – the bag layout was not my idea, but a general layout I saw on social media. I don’t know who designed the original layout, but I would love to credit that person! 🙂

While your here :), be sure to have a look at some of my other easy crochet patterns like:
All patterns on my blog are absolutely FREE of course!! 🙂
The pattern level:

This granny square tote bag crochet pattern is an easy crochet pattern. Totally beginner-friendly! You need to know the following:
If you are new to crochet and not familiar with any of the above mentioned, please click on the links and follow the easy tutorials! You will be able to make your crochet bag in no time!!!
Some FAQ and answers:
Can I adjust the size of the tote bag?
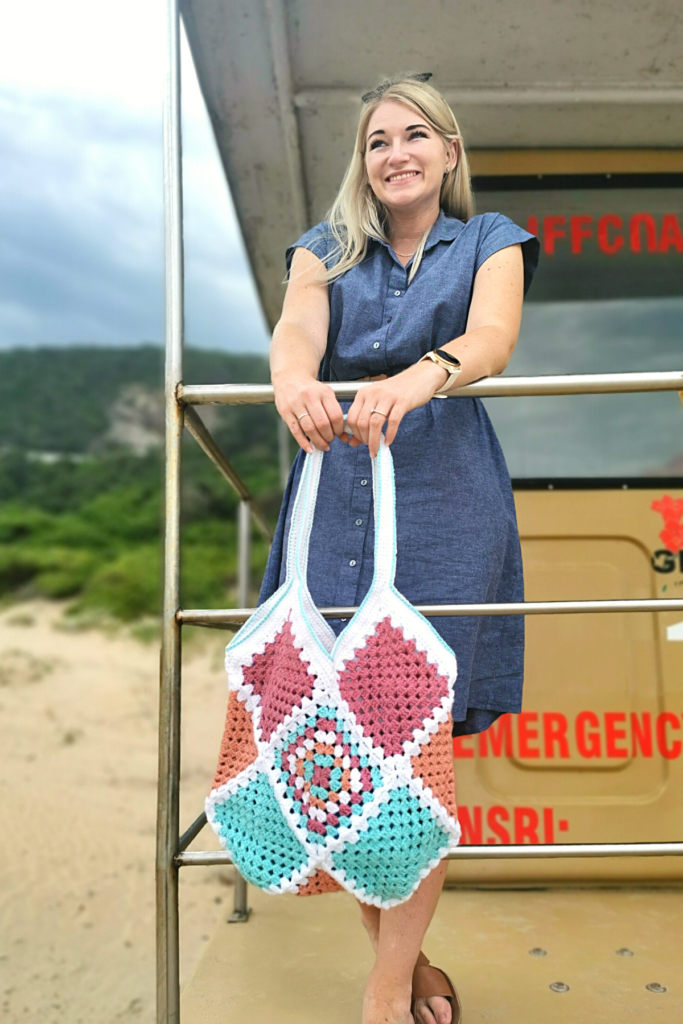
Yes you can! The size of the bag depends on the yarn you use. So this means that if you want a bigger (beach bag type) size, you can opt in for a worsted weight or bulky weight yarn and use it’s corresponding hook. To size down, you can use a #2 lace weight with it’s corresponding hook.
That is what’s wonderful about the this Granny Square Bag – completely customizable!!! 🙂
What Yarn Should I use?

I found that the optimal size yarn for this Tote bag is a #3 Dk light weight yarn. I used Kismet Yarn Raeesah 100% Cotton yarn, but I also made some bags, like the one below out of Acrylic Yarn!
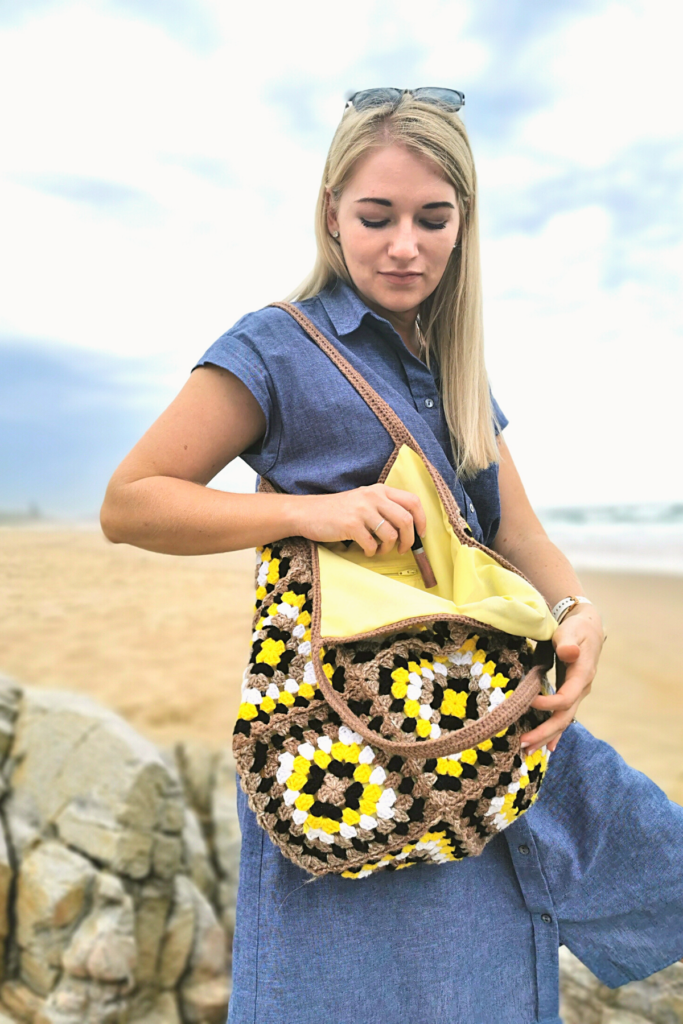
But if you use anything other than cotton, I do recommend blocking the bag and then lining it with fabric as well.
If you don’t have scraps of yarn laying around, you can use something like Lion Brand Comfy Cotton Blend Yarn which is a cotton blend yarn or Patons Grace Yarn which is a 100% cotton. Red heart super saver 100% Acrylic will also work if you want to use Acrylic yarn!
Want to line your Granny Square Tote Bag?
If you want to line your crochet bag, I found a very helpful tutorial on YouTube which uses a sewing machine. I am still new to sewing, so that’s why I rather reached out to YouTube for some guidance. Sometimes we need to know our limitations! Haha..
Here is a link if you want to use a sewing machine.
And here is a link if you don’t have a sewing machine and want to hand stitch your lining.
Let me know if you have any other questions by leaving a comment down below!! 🙂
The materials needed for the Granny Square Tote Bag
All materials are listed in the pattern below.
Let’s get started!
Now that you know all that is need to be known, I will not keep you any longer from crocheting this Granny Square Tote Bag.
Remember to follow me on Facebook and Instagram and share your creations with me on all my social platforms. Also pin this on your Pinterest boards if you want to make it again. And also remember to subscribe to my YouTube Channel for easy Crochet Tutorials and also easy to follow videos on my free crochet patterns!
Happy Crocheting!!! 🙂
~Nadine
Did you crochet this pattern? Be sure to leave a comment down below!

Granny Square Tote Bag Free Crochet Pattern
About the Pattern
- This pattern is made up out of Basic Granny Squares. You can make them in the specific colorway as shown below or if you are not particularly ready for color changing, you can make the squares in solid colors as well.
- Finish making all the squares before attaching them.
- To achieve the same measurements as the above-finished size – the exact gauge needs to be obtained.
- You can make the straps as long as you’d like. Remember to leave enough space in the middle. You will add the same amount of rows in the middle as you did on the side.
- If you want to make this bag in Acrylic Yarn you are more than welcome to. You will, however, need to block the bag before you line it.
- Lining the bag will help your bag to keep its shape when you put your belongings in it. As I am new to sewing – I used this very informative YouTube tutorial that showed me how to line my crochet bag.
- Please note that I did not come up with the layout of this bag – I am not sure who did – but would love to give credit to that person!
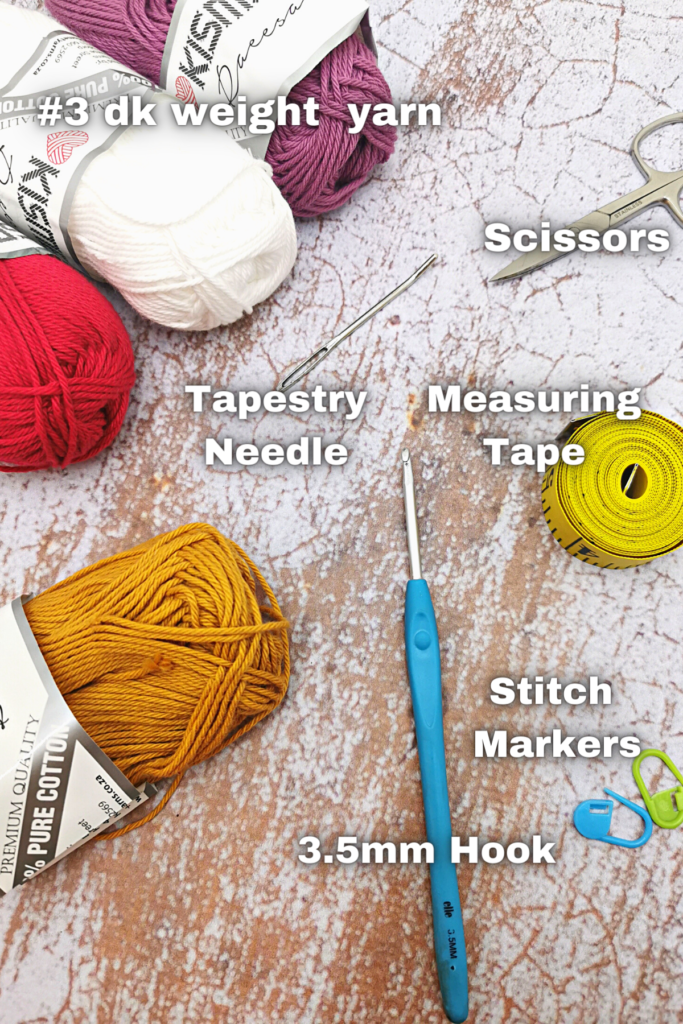
Tools and Materials
- 50g/1.7oz (100m/109yd) #3 light/ DK Weight yarn 100 % Cotton each in 4 colors. If you are changing color every round.
- 100g/3.5oz (200m/218yd) in same yarn , which will be the main color of the bag
- Size 3.5mm Hook US E/4
- Measuring tape
- Stitch Markers
- Tapestry Needle
- Scissors
Instructions
The Basic Granny Square Pattern with color changes:
Make 13 squares, change colors every round.
- (Tip: Change colors in different corners every round, otherwise the corner spaces will stretch)
- Work your first round in a Magic ring or Chain 4, sl st to the first ch, and work into the middle of the circle created.
- Rnd 1: Ch3 (counts as dc), 2dc, *ch2, 3dc; rep frm * two more times (4 clusters of 3dc), ch2, slst in top of ch3. Slst in the nxt 2 dc and the ch-spce, FO. Change colors. (12dc)
- Rnd 2: Ch3 (counts as dc), 2dc in the same sp, ch2, 3dc,*sk 3dc, (3dc, ch2, 3dc) into the same sp, rep from * two more times, sk3 dc and slst in top of ch3. Slst in the nxt 2dc and the ch-spce, FO. Change colors. (24dc)
- Rnd 3: Ch3 (counts as dc), 2dc in the same sp, ch2, 3dc, *sk 3dc, 3dc in next ch-sp, sk 3dc, (3dc, ch2, 3dc) into the same sp, rep from * three more times. At the end slst in top of ch3, slst in the nxt 2dc and the ch-spce, FO. Change colors. (36dc)
- Rnd 4: Ch3 (counts as dc), 2dc in the same sp, ch2, 3dc, *sk 3dc, 3dc in next ch-sp, sk 3dc, 3dc in next sp, sk 3dc, (3dc, ch2, 3dc) into the same sp, rep from * three more times. At the end slst in top of ch3, slst in the nxt 2dc and the ch-spce, FO. Change colors. (48dc)
- Rnd 5: Ch3 (counts as dc), 2dc in the same sp, ch2, 3dc, *(sk 3dc, 3dc in next ch-sp) x 3, sk 3dc, (3dc, ch2, 3dc) into the same sp, rep from * three more times. At the end slst in top of ch3, slst in the nxt 2dc and the ch-spce, FO. Change colors. (60dc)
- Rnd 6: Ch3 (counts as dc), 2dc in the same sp, ch2, 3dc, * (sk 3dc, 3dc in next ch-sp) x 4, sk 3dc, (3dc, ch2, 3dc) into the same sp, rep from * three more times. At the end slst in top of ch3, slst in the nxt 2dc and the ch-spce, FO. (72dc)
- Weave in all ends and continue to connecting the granny squares.
Connecting the Granny Squares:
- I used the join-as-you-go method, which I will show you in the next step.
- If you want to connect the squares differently than shown in the pattern – you need to crochet 7 rows of the granny square and sew them together using your preferred method.
- Before you begin, lay your squares out as shown below.

- After you’ve arranged your squares, you can start joining.
The Join-as-you-go method:
- Start in the bottom right corner.
- Square 1: Connect your main color to the square and crochet a 7th round around the square. Finish off.
Attach square 1 to 2:
- These steps are all for crocheting around the square, explained in bullet form for easier reading.
- Connect your main color to the corner of square 2. Ch3 (counts as a dc), 2dc in the same space, ch1.
- Place Square 1 and Square 2, wrong sides together, and slip stitch into the corner of Square 1.
- *3dc in the next ch-sp of square 2, ch1.
- Slip stitch into the next ch-sp of square 1 (located next to the corner-sp), now jump back to square 2 and insert 3dc into the next ch-sp, ch1.
- Repeat from * until you reach the next corner-sp.
- 3dc in the corner-sp of square 2, ch1.
- Slip stitch into the corner of square 1.
- 3dc in the corner-sp of square2, ch1.
- Continue to crochet around the square.
- At the end, finish off and weave in your ends.
- Attach the squares as pictured below, starting with the back panel first.
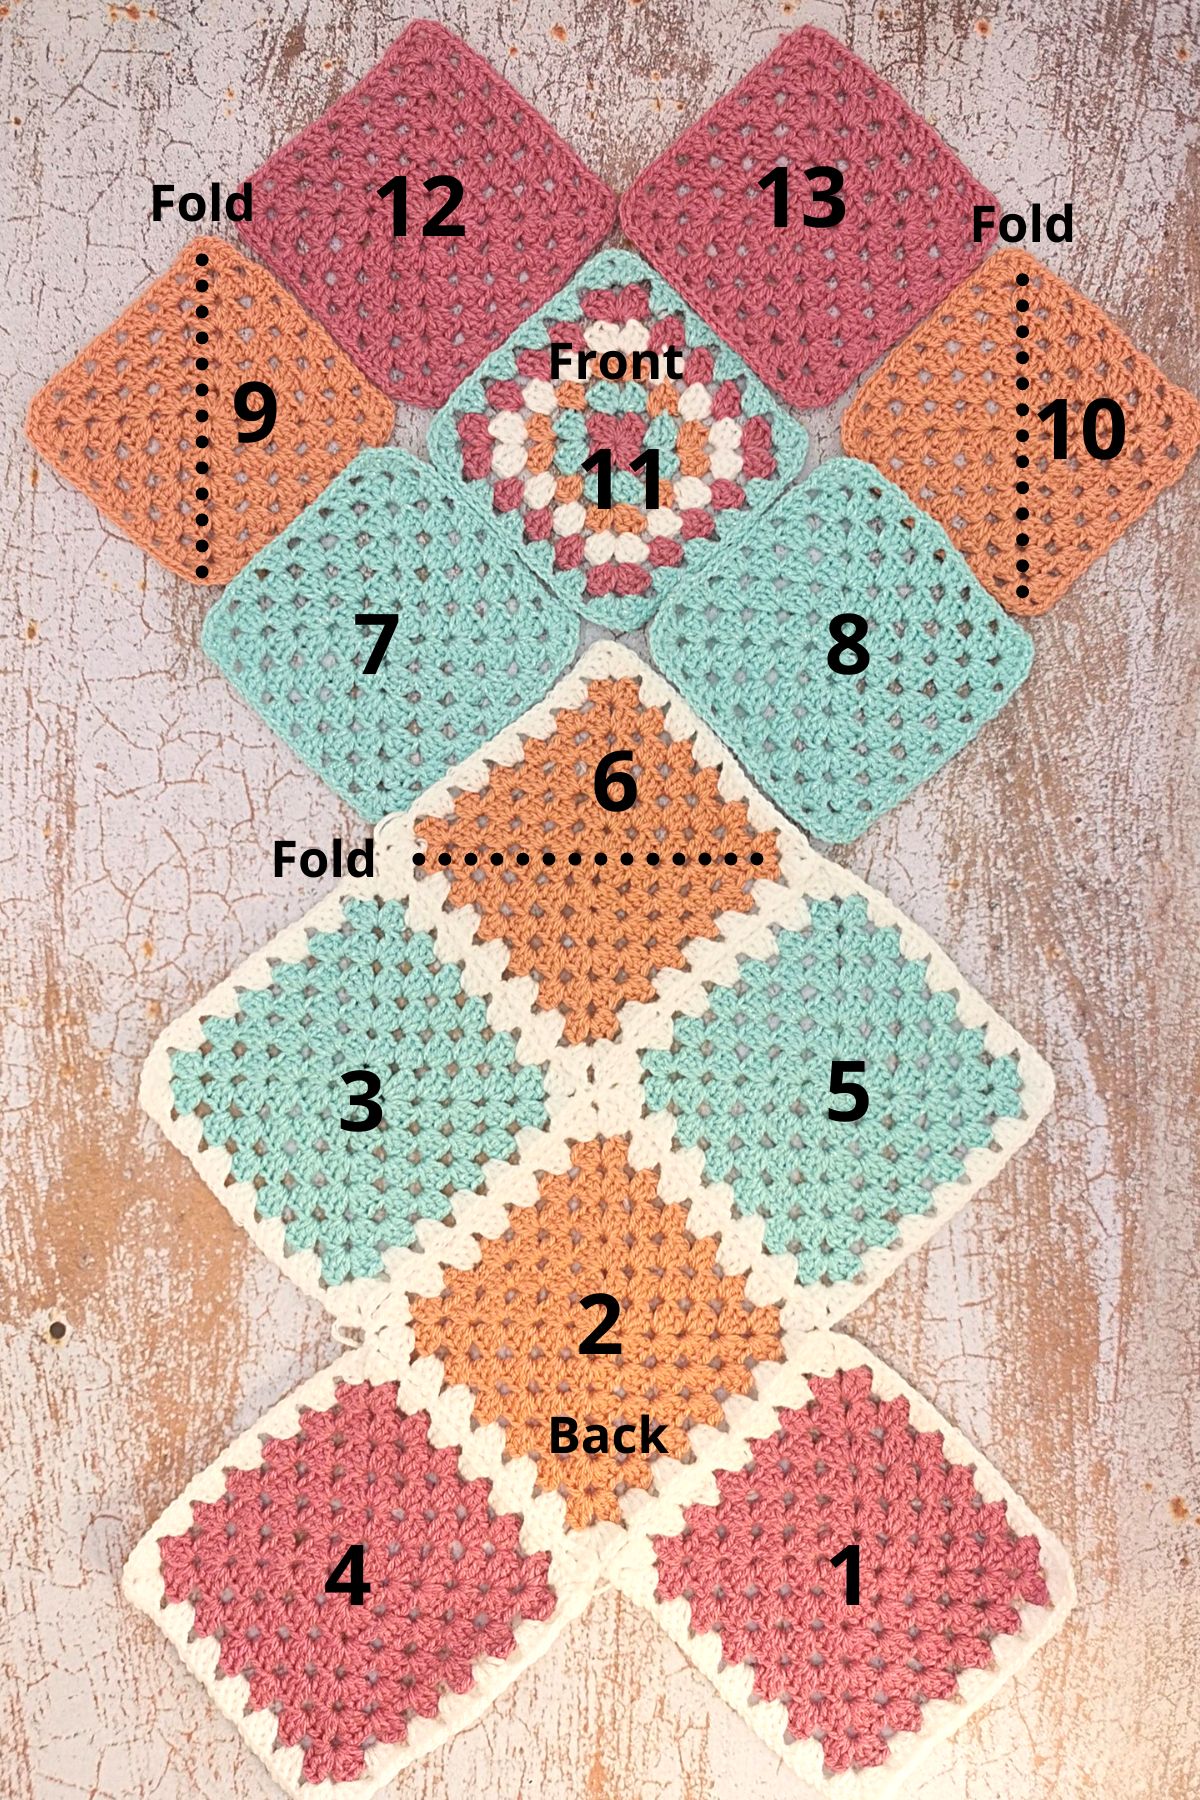
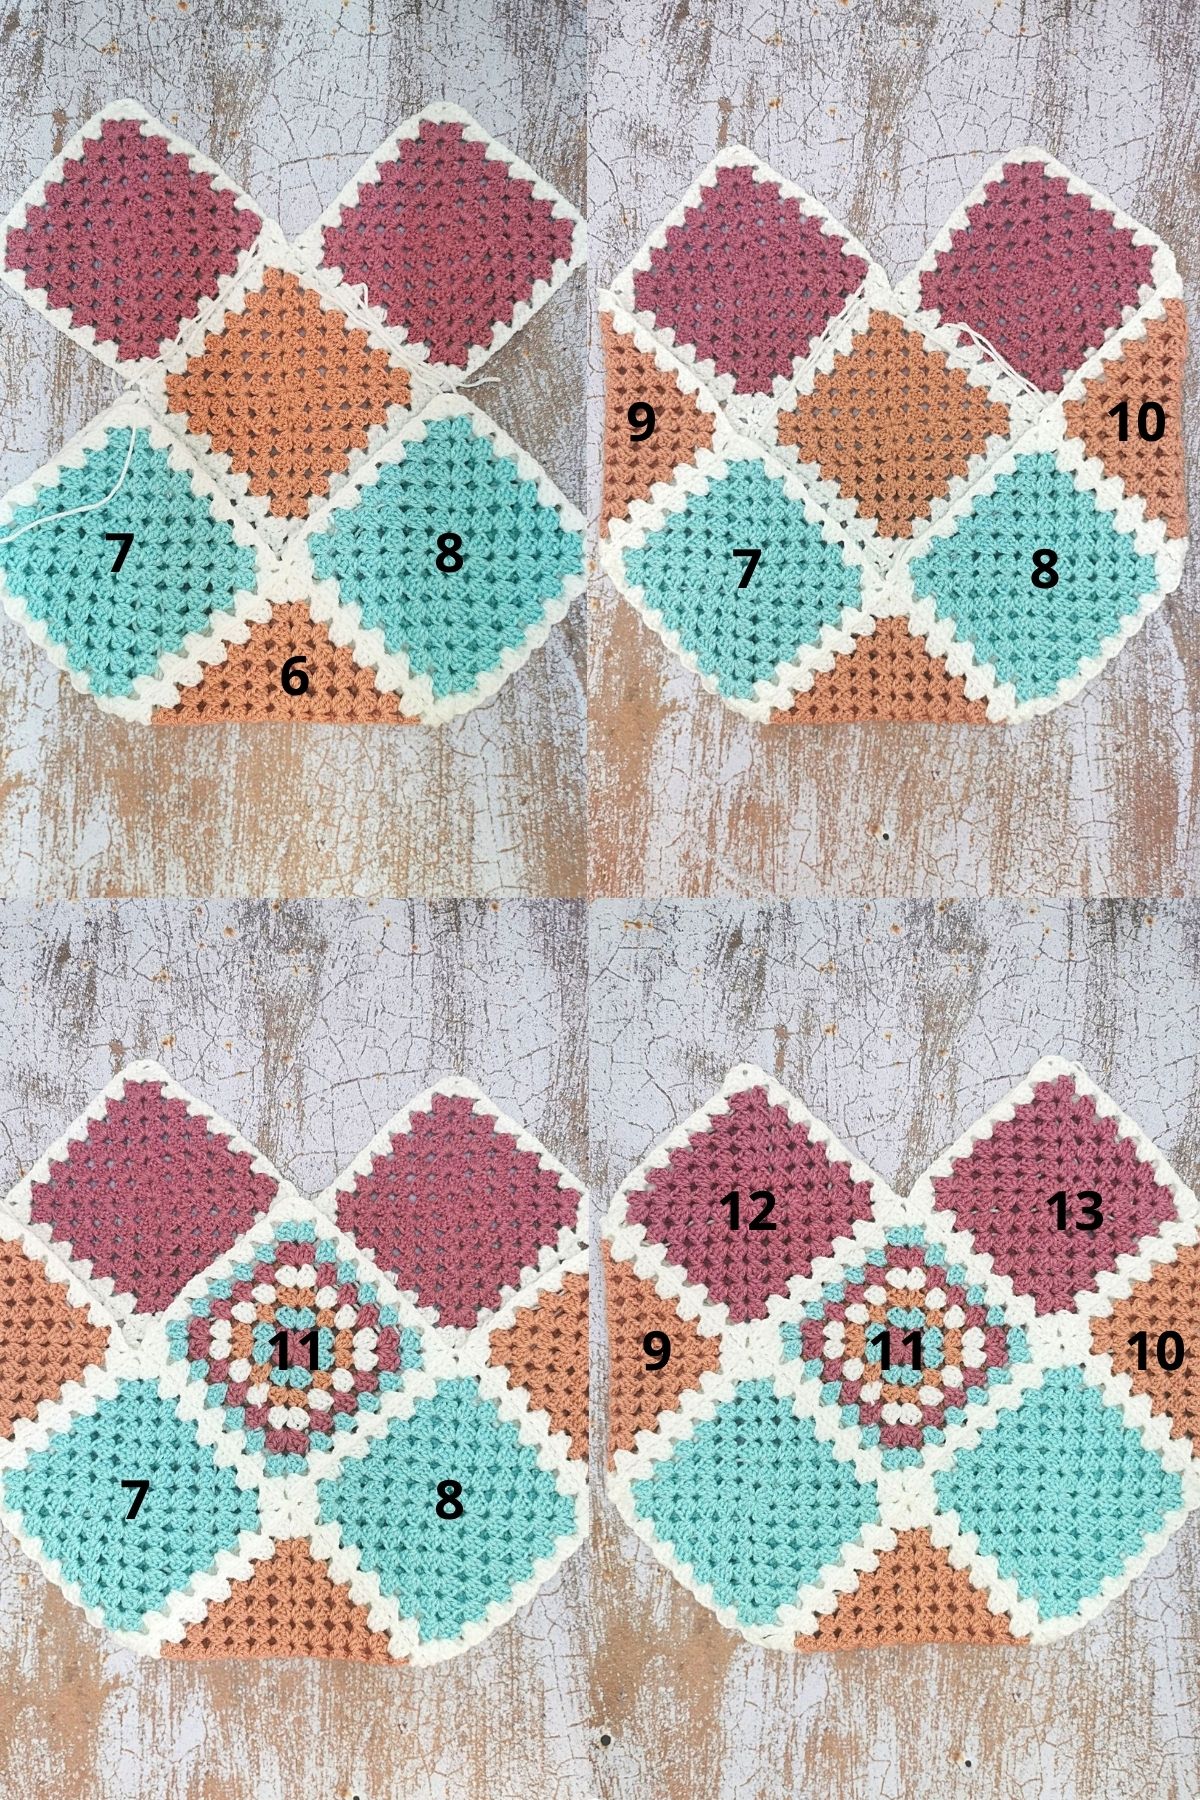
- Then turn the back panel so the wrong side is facing towards you. Fold square 6 up and pack the remaining 7 squares as pictured below.

- Start to join squares 6 to 7 then 6 to 8.
- Squares 9 and 10 will be attached to the back and front panels.
- Then attach square 11, 12 and 13.
- Tip: When you reach the point where you need to connect four squares, don’t chain after making the 1st 3dc in the 1st corner. Slip stitch into each of the opposite corners you need to connect to. Then continue to crochet as normal with the next 3dc in the same space.
- After connecting all the squares – weave in all the ends securely and continue to the sides of the bag.
Sides and straps of bag:
- You will now work in the round and crochet a row around the entire bag.

- With your front side facing you, connect your main color to the top right corner (peak) in the ch2-spce. Ch1, *3sc into the same space (Mark the second sc with a stitch marker), 1sc in each of the next 3 stitches, and 1Sc in each ch-space until you reach the next corner-sp, sc3tog in the next 3 corner spaces (valley). Continue to Sc in each st until you reach the next corner.

- Repeat from * until you reach the beginning of the round. Sl stitch into the 1st sc of the round.
- Front side facing you, you will now crochet in rows on the right side of the bag.
- Row 1: Working from the previous round – * Sc into the first stitch, ch1 and turn to work in rows. 1Sc into each stitch until you reach the middle of the bag, sc3tog in the middle of the squares and continue to sc up the row until you reach the stitch marker. 1Sc into the marked stitch, ch1, and turn your work.
- Row 2: Repeat from * until you have 2 rows of sc and 3 rows including the first round of sc you made around the bag.
- Finish off.
- Front side facing you, you will now crochet in rows on the left side of the bag.

- With your bag lying front side facing you, connect the main color yarn to the left corner where you placed your stitch marker. You will now work in rows as you did on the right side, until you have 3 rows including the first round of sc you made around the bag.
- DO NOT FINISH OFF
Straps:
- You are now working on the back of your bag.

- Ch120.
- Connect the chain with a slip stitch to the top of the square next to the one connected the chain. 1sc in each st across, sc3tog in the middle of the bag, and sc across until you reach the corner of the next square.
- You are now on the front square of your bag.
- Ch120 and connect with a slip stitch to the top of the next square just as you did in step 1. 1sc in each st across, sc3tog in the middle of the bag and sc across until you reach the chain you made the first time.
- Now sc in each ch (in 1 loop only) of the strap, when you reach the end of the chain, continue to sc across the bag as you did in the previous step, until you reach the 2nd chain you made. Repeat the same process for this chain and side as you did the 1st one.
- At the end, slip stitch into the 1 sc of the round and finish off.
- Weave in all your ends and your bag is finished!

I just used this pattern and really liked the result! I also really liked the detail of a different coloured edge in some of the pictures! I tried it with both a slip stitch or single crochet but ended up going with an extra row of single crochet in my secondary colour (I only used 3 colours all together) all around to finish it off!
That’s great Niki. Glad to hear you enjoyed making your tote bag!
Really hope you can create a video for this so I can see how you join them.. thanks
Working on that! 🙂
Hey there! When working with sides, what does “sc3tog” mean?
Hi Jennie. It means to single crochet the next 3 stitches together. I’ve included a description of the stitch underneath the abbreviation list.
I’m so confused. I can’t figure what I’m doing to finish the bag. I have all the squares together now I’m lost. I wish there was a iTunes video.
Sorry to hear you are struggling with this Robin. We are in the process of making more video tutorials this year so keep an eye on our Youtube channel!
Size of each square would be helpful to me.
Hi there! The square size is 12cm x 12cm or 4.7inch x 4.inch.
Bit confused with the sides when it comes to the straps, I will make it work but too bad its not clear …I’m visual but your pics are not very clear, a video would have been great
Hi Tanya. So sorry to hear hat. I’ve updated the pattern and images, I hope they are a bit clearer now.
Why do you need to 3sctog in the first row of the handles?
Hi John. Thanks for your question. You are working the straps continuously. So you need to sc3tog in the front/back or the “valleys” to compensate for the increases/3sc you make on the sides or “peaks” of the bags.
Never mind on the asterisks question. I figured it out….it’s just the ch1 spaces between corners. 😁 Feel free to not publish that comment. I really like your pattern so far!
I never found the actual granny square pattern & with youtube constantly covering the text I gave up. Its a very cute bag. I always like to try the pattern before buying one and this one I found instructions for everything except the granny square itself.
Hi Tina. Sorry to hear that ands thanks for letting me know. I am busy updating my website and will add a clear pattern on how to make the granny square in this post as soon as possible. For now, you can head over to my post on how to make a granny square.
Hi,
I have joined all the squares together, however for the life in me I cannot figure out how to join the two ‘fold’ squares for the sides to the back and front? I have tried multiple times. Can anyone help please?
Hi Lauren! I’ve updated the pattern and images on the pattern. I hope it helps!
Hi, when joining sq 1 and sq 2 I can’t figure out how to do the 3dc and slip stitch, since they have a different number of ch spaces. After doing round 7 on sq1 there are 3 ch spaces and I’m meant to connect that to 2 on sq 2? Maybe it’s just me but the math isn’t mathing and I’d hate to throw out all this work I did on your pattern.
Hi Peach. Please see the updated pattern above. I’ve explained it a bit more now and hopefully its easier to understand.
With the peaks is it only the corners facing up or all side corners? Like as your going around the crochet turns obviously so does every up corner get 3 sc?
Also when going around the bag on the next part do you go all the way down in your rows to the other side of the crochet or is it just to the side of the square?
Hi Shelby. The corners facing up are the peaks (two at the front and 2 at the back) and you need to place 3sc in each of those corners. For the sides, you only crochet down the sides of the bag.
love this pattern! almost done mine in a nice green palette 🙂
wanted to point out that in Round 1, I noticed step 2 is repeated twice. I kept doing it twice & getting confused but just do it once & it works!
Thanks for pointing that out Alyssa! I corrected the typo.
I like very much the way you give the instructions, they are very understandable. Thank you
I have questions about the peaks/ch2 sp.
1. Do I do 3sc ch1 3sc just on the ch2sp on the left sides of each peak (repeating the 3sc ch1 3sc 4x only)? both sides of each peak (repeating 3sc ch1 3sc 8x)? Because the yarn is white in the illustrations I can’t make out the stitches to check.
2. Is the ch2sp the very next space left and/or right of each peak space?
Thanks so much! Excited to finish my beautiful bag!
Hi Sarah! You only place 1 x 3sc in the ch2sp of the previous row at the peaks/ side corner space of the bag and the ch2sp is the corner of the granny square. Hope that helps!
Dank je wel voor dit patroon! Ik ben bijna klaar met de tas, heel leuk om te maken en goed te volgen voor een beginner 🙂
this is soo confusing, I can’t understand how you did the sides of the bags. pictures and directions are not very clear 🙁
Hi! I’ve just tried making this with the two types of granny squares using the counts listed above (6 of one and 7 of the other) and no matter what I do, I can’t get them to sit evenly.
On reflection should the count be 5 of one and 8 of the other to create a balanced bag?
Hi Melissa! This is just a example of the color combinations you can make. If you are making the two color types then you need 6 of one color and 7 of the other. You will place 4 red in front with 1 pink in the middle. Then 1 red on the left and 1 red on the right. Then at the back the pattern is reversed. 4 pink with 1 red in the middle and 1 pink on the bottom. If you don’t want the pattern to be reversed then you can go ahead and make 5 of one and 8 of the other to make it identical on both sides.
I find it hard lining the bag. Will the bag go wrong or tear on anything if I don’t line it ?
I’m almost done, thank you so much for such an easy to follow pattern.
Hi Mary! I’m so happy to hear you enjoyed the pattern! You can use your bag without a lining and it will be fine. If you used acrylic yarn, it does have a tendency to stretch with use. Just something to keep in mind.
If you don’t line it, there are two things that can happen:
1. It will stretch with the weight of the items you put inside, and become ugly
2. Granny squares are holey, so small items like lip gloss or pens or keys might fall off.
3. You won’t have any pockets in the bag for your smalls, so that you can find the easily. I suppose you could put them in a little pouch, but a pocket is super useful in any bag
Do line your bag, it’s worth it. It might seem hard the first time, but once you learn how to do it, then you can do it for all your bags.
Thanks for sharing Irmar!
Hi how many blocks do i need?
You will need 13 squares. 🙂
whipped this up for my daughter! it was easy to make (except for the endless ends to see under haha) thank you for the pattern
Awesome Annick! So happy to hear you enjoyed making your bag. And yes, the ends are not fun.. haha
Wat een super goede uitleg ! Ik ben FAN van jou !!
Ontzettend bedankt! 🙂