Bunny Lovey Blanket

Whether it’s Easter, a baby shower or just a gift to a girl or boy, this Bunny Lovey Blanket is going to be your new go-to pattern to crochet! This pattern is easy and versatile, because you can make the bunny and blanket the color you prefer.
I’ve been working on this Bunny Lovey Baby Blanket for quite some time now. I wanted it to be PERFECT! Not only the pattern but also the way the bunny looks and feels. The blanket needed to be big enough but not too small.. I know, I know I’ve been the one saying that your crochet work doesn’t always need to be perfect, BUT I sometimes get this OCD with patterns that are near to my heart.

So you can rest assured that this pattern is a solid 10/10! (In my books definitely 🙂 ) It feels to me that pictures doesn’t do this cuteness justice. This Bunny Lovey is completely one of my favorite projects I’ve done in a while!
The Detail in the Lovey Blanket
The simple detail in the blanket is made with only double crochet stitches. The blanket is a simple solid granny square which works up really fast once you get the drift of how it works. All you need to remember is to double crochet in to each of the previous double crochets made in the previous rows and insert two double crochets in the corners followed by a chain 2 and another two double crochets in the corner.

To begin each round, you need to make a chain two at the beginning of the round, which counts as your first double crochet in that corner. Then you continue to double crochet into each stitch until you reach the next corner. After you finish each round, you slip stitch into the top chain two, turn you work and slip stitch into the corner to start your new round. The pattern does give you the stitch count after each round you work.


You will see the bigger your blanket gets, the more it will start to ruffle up. That is fine because you want it to do that as it creates the flow of the blanket.


The Making of the bunny
The bunny head, ears and arms are made in continues spirals (rounds) by placing a stitch marker in the first stitch of the round and by moving in up as you go. Remember to count your stitches when making the bunny parts. If you don’t count and you lose a stitch somewhere, you increases and decreases will not work out.
Stuff the head firmly, but do not over stuff. Insert small amounts at a time until you get the shape right. Over stuffing might stretch the fabric too far and show gaps and under stuffing will give a deflated look. Take your time with this step.


Leaving a long tail at the end is essential at the end for sewing everything in place. When sewing each part to the head and blanket, use safety pins to put the in place. That way you will get an idea of how everything looks before you start sewing.
The Embroidery of the Bunny face
The embroidery of the bunny face is super easy. You can also feel free to use your imagination and do your own spin, but I use this method in all the features on the face.


Pattern Level
This Bunny Lovey Blanket crochet pattern is for the Skilled Beginner, meaning you are some what new to crochet but can do increases, invisible decreases and had a shot at amigurumi too.
But don’t be alarmed if this will be your first time doing something like this. This pattern is written as easy as possible for you to understand. You will never know until you try! 🙂

My inspiration for this cute bunny lovey crochet pattern:
From the beginning of my crochet journey, I’ve loved making amigurumi (mostly key chains and teddies) as gifts to my friends and family. Now that I have enough knowledge I figured that making lovies is actually a great gift for babies or mommies to be.
By embroidering the facial features to the head, I thought that it will be much safer that safety eyes. An accident can happen in a blink of an eye with the little ones.

Some FAQ and answers:
Can I adjust the size?
It’s better to not change the size of this bunny lovey crochet pattern, however you can make the blanket bigger by adding more colors if you’d like. If you’d really like to make the bunny bigger, try using a bigger size yarn with a hook size two times smaller than the yarn calls for.

What size yarn do I use?
For this pattern I used Number 4 Worsted weight yarn in 3 colors. White, grey and cloud blue. (100g/ 3.5oz) (160m/ 175yards) of each color. Go on and use your imagination with the colors! I would love to see it too! Like if you want to make one for a girl you can use pink and purple with a white bunny or even a gender neutral color like the green one I made or you can even bring in some yellow too.
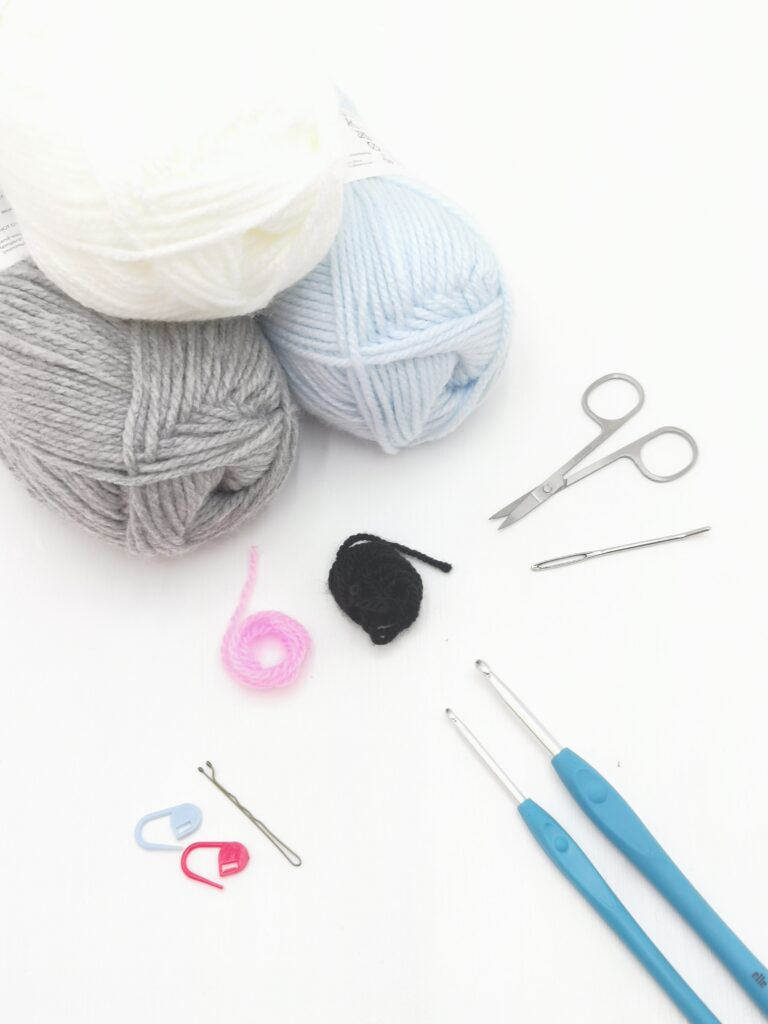
The materials needed?
You will need the following materials:
- Your choice and colors of Number 4 worsted weight yarn
- A small amount of DK weight yarn in black and pink for the bunny face
- A 3.5mm hook (US E/4) and a 5.5mm hook (US I/9)
- Scissors
- Tapestry Needle
- Stitch Markers
- Stuffing for the Bunny head and arms
- Safety Pins
How long does it take to make this Bunny Lovey Blanket?
It depends on the maker this time, but I was able to do it in a few days time. If you are to sit and make this and only this without any distractions you will be able to make it in one or two days. 🙂
Assembly of the Bunny Lovey Blanket:
- Embroider the face as you like.
- Attach the ears to the top of the head 2 rows from the beginning row. To help you see what it looks like before you sew the ears to the head, pin them in place first with safety pins.
- Attach the arms on the middle of the blanket square.
- Attach the head on the middle of the blanket on top of the arms.


Techniques you need to know for this Lovey:
SC (Single Crochet) – 1. Insert your hook into center of your next working chain. Grab yarn (known as a yarn over) and draw through the chain stitch and up onto the hook so that you have two loops on your hook.
2. Using your hook, grab yarn and draw it through both loops on your hook, leaving just one loop on your hook. You’ve made one single crochet stitch.
3. Repeat steps 1 and 2 as many times as your pattern calls for.
DC (Double Crochet) – 1. Yarn over, then insert your crochet hook into the center of your next working chain. Yarn over and draw through the chain stitch and up onto the hook so that you have three loops on your hook.
2. Yarn over and pull through two of the loops on your hook, leaving two loops on your hook.
3. Yarn over again and pull through both loops on your hook, leaving just one loop. You’ve just made one double crochet stitch.
4. Repeat steps 1-3 as many times as your pattern calls for.
INC (Increase) – To work a stitch increase, you will crochet a certain number of extra stitches into a single stitch (according to your pattern), increasing the number of stitches available to work into for the next row.
DEC (Decrease) – To work a stitch decrease, you will crochet a certain number of stitches together (according to your pattern), reducing the number of stitches available to work into for the next row.
If you would like a PDF of this crochet pattern – head over to Etsy and you can support my small business by buying this pattern at a fraction of the price! Get 15% off when buying this pattern in January! Click here to get this pattern on PDF!
Let’s get to it!
Oky let’s get started on this incredibly cute Bunny Lovey Blanket!
Remember to follow me on Facebook and Instagram and share your creations with me on all my social platforms! Also pin this on your Pinterest boards if you want to make it later 🙂
I can’t wait to see hoe your Bunny Lovey Blanket turns out!!
Happy crocheting!! 🙂
~ Nadine

Bunny Lovey Blanket Crochet Pattern
This pattern is written in US Terms
Patten Level: Skilled Beginner
Materials:
- Number 4 Worsted weight yarn in 3 colors. I used white, grey and cloud blue. (100g/ 3.5oz) (160m/ 175yards) of each color
- A small amount of DK weight yarn in black and pink for the bunny face
- Size 3.5mm Hook (US E/4) for the bunny & 5.5mm Hook (US I/9) for the blanket
- A Stitch Marker (I like using a bobby pin)
- Tapestry Needle
- Scissors
- Stuffing for the bunny head and arms
Abbreviations:
- MR = Magic Ring
- Sl st = Slip stitch
- Ch = Chain
- Sc = Single Crochet
- Dc = Double Crochet
- St(s) = Stitch (s)
- Rep = Repeat
- Inc = increase – insert 2 single crochet into 1 stitch.
- Dec = decrease – crochet 2 stitches together to make 1 stitch.
- To help you read this pattern, the commas represent each stitch or the number of stitches after x. For example – (sc,inc) would mean sc into next stitch, increase (2sc) in the following stitch. Or (sc x 4, inc) would mean sc into each of the next 4 stitches, increase in the following stitch.
- For example [sc,inc] x 6 means to repeat the pattern between the brackets 6 times.
Gauge:
10cm x 10cm / 4in x 4in = 13 stitches x 8 rows
Finished Size:
Bunny: From top of ears = 17cm / 6inch
Blanket: 56cm / 22inch (w) x 56cm / 22inch (l)
Notes:
For the Bunny:
- When working the bunny head, arms and ears, work in continuous spirals, without closing off the rounds with a slip stitch.
- Use a stitch marker at the beginning of each round. This helps when counting your stitches to compare it with the pattern.
- Stuff the head firmly, but do not over stuff. Insert small amounts at the time until you get the shape right. Over stuffing might stretch the fabric too far and show gaps and under stuffing will give your bunny a deflated look. Take your time! 😊
- To help you when sewing pieces together, first pin them into place and check that you are happy with the placements.
- The number of stitches is shown after each round between brackets ()
For the Blanket:
- Make sure that your tension stays the same when you make the blanket.
- The blanket is a continuous solid granny square. This makes it easy because you only need to dc in each stitch and add 2dc,ch2,2dc in the corners for each round.
- You can alternate colours as you like, just follow the stitch count from the pattern.
- Weave in the ends on the blanket after each round or crochet over the ends as you go. It makes much less work at the end.
Bunny Lovey Baby Blanket Pattern:
Bunny Head:
With the main colour yarn and 3.5mm hook, make a magic ring
R1: 6sc into the MR (6)
R2: [inc] x 6 (12)
R3: [sc,inc] x 6 (18)
R4: [sc x 2, inc] x 6 (24)
R5: [sc x 3, inc] x 6 (30)
R6: [sc x 4, inc] x 6 (36)
R7: [sc x 5, inc] x 6 (42)
R8-19: sc in each st around (42)
R20: [sc x 5, dec] x 6 (36)
Start stuffing the head and continue to stuff as you go.
R21: [sc x 4, dec] x 6 (30)
R22: [sc x 3, dec] x 6 (24)
R23 : [sc x 2, dec] x 6 (18)
R24 : [sc, dec] x 6 (12)
R25 : [dec] x 6 (6)
Finish off and leave a long tail. Sew the head closed weaving the tail in between the last stitches. Finish off and leave a long tail for sewing
Bunny Ears (make 2): do not stuff
With the main colour yarn and 3.5mm hook, make a magic ring
R1: 6sc into the MR (6)
R2: [sc,inc] x 3 (9)
R3: 9sc (9)
R4: [sc x 2, inc] x 3 (12)
R5: [sc x 3, inc] x 3 (15)
R6: 15sc (15)
R7: [sc x 4, inc] x 3 (18)
R8-12: 18sc (5 rows)
R13: [sc x 4, dec] x 3 (15)
R14: 15sc (15)
R15: [sc x 3, dec] x 3 (12)
R16: 12sc (12)
R17: [sc x 4, dec] x 2 (10)
Fold end of ear flat and sc x 5 through both sides across.
Bunny Arms (make 2): Stuff lightly
With the main colour yarn and 3.5mm hook, make a magic ring
R1: 6sc into the MR (6)
R2: [inc in each st across] (12)
R3-6: 12sc (3 rows)
R7: [sc x 4, dec] x 2 (10)
R8-15: 10sc (8 rows)
Fold end of arm flat and sc x 5 through both sides across. Finish off and leave a long tail for sewing
Lovey Blanket:
With the main colour yarn and 5.5mm hook, chain 4 and slip stitch into the first chain made.
R1: ch2, 2dc into middle of circle, ch2, *3dc, ch2* rep from * to * x 3, sl st into the top of ch2 to connect the round, turn, sl st into the next corner.
R2: ch2, dc into the same space, * 3dc, 2dc into the corner space, ch2, 2dc into the same corner space * rep from * to * until end, 2dc in last corner space, ch2, sl st into top of ch2, turn, sl st into next corner.
R3: ch2, dc into the same space, *7dc, 2dc into the corner space, ch2, 2dc into the same corner space * rep from * to * until end, 2dc in last corner space, ch2, sl st into top of ch2, turn, sl st into next corner.
R4: ch2, dc into the same space, *11dc, 2dc into the corner space, ch2, 2dc into the same corner space* rep from * to * until end, 2dc in last corner space, ch2, sl st into top of ch2 turn, sl st into next corner.
Finish off the yarn and weave in ends.
Connect next colour yarn by tying it on one of the corners. Insert hook into the space, yarn over and pull through.
R5: ch2, dc into the same space, *15dc, 2dc into the corner space, ch2, 2dc into the same corner space* rep from * to * until end, 2dc in last corner space, ch2, sl st into top of ch2 turn, sl st into next corner.
R6: ch2, dc into the same space, *19dc, 2dc into the corner space, ch2, 2dc into the same corner space* rep from * to * until end, 2dc in last corner space, ch2, sl st into top of ch2 turn, sl st into next corner.
R7: ch2, dc into the same space, *23dc, 2dc into the corner space, ch2, 2dc into the same corner space* rep from * to * until end, 2dc in last corner space, ch2, sl st into top of ch2 turn, sl st into next corner.
Finish off the yarn and weave in ends.
Connect next colour yarn by tying it on one of the corners. Insert hook into the space, yarn over and pull through.
R8: ch2, dc into the same space, *27dc, 2dc into the corner space, ch2, 2dc into the same corner space* rep from * to * until end, 2dc in last corner space, ch2, sl st into top of ch2 turn, sl st into next corner.
R9: ch2, dc into the same space, *31dc, 2dc into the corner space, ch2, 2dc into the same corner space* rep from * to * until end, 2dc in last corner space, ch2, sl st into top of ch2 turn, sl st into next corner.
Finish off the yarn and weave in ends.
Connect next colour yarn by tying it on one of the corners. Insert hook into the space, yarn over and pull through.
R10: ch2, dc into the same space, *35dc, 2dc into the corner space, ch2, 2dc into the same corner space* rep from * to * until end, 2dc in last corner space, ch2, sl st into top of ch2 turn, sl st into next corner.
R11: ch2, dc into the same space, *39dc, 2dc into the corner space, ch2, 2dc into the same corner space* rep from * to * until end, 2dc in last corner space, ch2, sl st into top of ch2 turn, sl st into next corner.
Finish off the yarn and weave in ends.
Connect next colour yarn by tying it on one of the corners. Insert hook into the space, yarn over and pull through.
R12: ch2, dc into the same space, *43dc, 2dc into the corner space, ch2, 2dc into the same corner space* rep from * to * until end, 2dc in last corner space, ch2, sl st into top of ch2 turn, sl st into next corner.
R13: ch2, dc into the same space, *47dc, 2dc into the corner space, ch2, 2dc into the same corner space* rep from * to * until end, 2dc in last corner space, ch2, sl st into top of ch2 turn, sl st into next corner.
R14: ch2, dc into the same space, *51dc, 2dc into the corner space, ch2, 2dc into the same corner space* rep from * to * until end, 2dc in last corner space, ch2, sl st into top of ch2 turn, sl st into next corner.
Finish off the yarn and weave in ends.
Connect next colour yarn by tying it on one of the corners. Insert hook into the space, yarn over and pull through.
R15: ch2, dc into the same space, *55dc, 2dc into the corner space, ch2, 2dc into the same corner space* rep from * to * until end, 2dc in last corner space, ch2, sl st into top of ch2 turn, sl st into next corner.
R16: ch2, dc into the same space, *59dc, 2dc into the corner space, ch2, 2dc into the same corner space* rep from * to * until end, 2dc in last corner space, ch2, sl st into top of ch2 turn, sl st into next corner.
R17: ch2, dc into the same space, *63dc, 2dc into the corner space, ch2, 2dc into the same corner space* rep from * to * until end, 2dc in last corner space, ch2, sl st into top of ch2 turn, sl st into next corner.
Finish off the yarn and weave in ends.
Connect next colour yarn by tying it on one of the corners. Insert hook into the space, yarn over and pull through.
R18: ch1, sc into the same space, *67sc, 2sc into the corner space, ch2, 2sc into the same corner space* rep from * to * until end, 2sc in last corner space, ch2, sl st into top of ch1.
Finish off the yarn and weave in ends.
Assembly:
- Embroider the face as you like.
- Attach the ears to the top of the head 2 rows from the beginning row. To help you see what it looks like before you sew the ears to the head, pin them in place first with safety pins.
- Attach the arms on the middle of the blanket square.
- Attach the head on the middle of the blanket on top of the arms.
What brand yarn did you use? I love the blue and the mint color, looks soft.
Hi Jill! I used a South African brand called Elle and the yarn is from their Charity Chunky brand. Here’s a link to a shop in South Africa that delivers overseas: The Wool Shoppe
Hi there,
I was wondering if this bunny lovey could be made with a #6 chenille yarn such as Himalayan Dolphin yarn and a size 4 or 5 crochet hook? It’s a really cute pattern. Thank you for sharing it.
Hi Mary! Yes, you can definitely do that. Hope you enjoy the pattern!
Thank you!
The instructions for the lovey blanket does not indicate how many stitches are in that row. Is it possible to edit the instructions?
Thank you
Tess
Hi Tess! Thank you for your comment! I am busy editing the pattern and will include the stitches per row for the blanket! It will be ready by next week Monday!